PostgreSQLで、次のようなテーブルを作成し、データを入れます。
ここで、WHERE区にlast_nameとfirst_nameに条件を設定してデータを取得します。
結果は次のようになります。
これと同様のことをOracleで試してみました。
結果は次のようになります。
エラーとなりました。
そこで、WHERE区を
と修正して実行してみると
正しく動作しました。
Oracleでは、値を入れる辺を括弧で括ってやるとうまくいくようです。
元々、次のように
IN区で複数の条件を指定するように作られているのかな?っという気がしますが、どうなんでしょう。
2015年4月20日月曜日
2014年10月24日金曜日
UNIQUE制約でのNULLの扱い
ラベル:
ADO.NET
,
PostgreSQL
0
コメント
PostgreSQLで、テーブルの複数列でUNIQUE制約をかけたとき、その中にNULLを許可する列があった場合の挙動について。
次のテーブルを作成します。
このテーブルに次のINSERT文でデータを入れてみます。
結果は次のようになります。
id=3は、UNIQUE制約違反でINSERTに失敗しています。
ここで引っかかったのはid=5がUNIQUE制約違反にならず、INSERTに成功しているところです。
私のイメージだと、NULLは何もないという感覚だったので、id=4とid=5のデータはUNIQUE制約に違反してid=5はINSERTに失敗すると思っていました。
調べてみると、PostgreSQLの一意制約の解説では、
文中の
OracleやMySQLなどはPostgreSQLと同じ挙動をするんだとか。
移植の際などには気をつける必要があります。
対策としては、std列をNOT NULLとして、id=4,id=5には''を入れるようにすれば、意図した動きになります。
では、ADO.NETのDataTableはどうなんでしょう?
こんなサンプルを作って試してみました。 結果はこうなりました。 PostgreSQLとは異なり、NULLを同じ値として扱っているようです。
PostgreSQLにNULLを許可した列を含むUNIQUE制約を持つテーブルからADO.NETのDataTableにデータを取り込んだ場合、エラーになる可能性が考えられます。
UNIQUE制約をかける列は、NOT NULLにするべきでしょうね。
次のテーブルを作成します。
このテーブルに次のINSERT文でデータを入れてみます。
結果は次のようになります。
id=3は、UNIQUE制約違反でINSERTに失敗しています。
ここで引っかかったのはid=5がUNIQUE制約違反にならず、INSERTに成功しているところです。
私のイメージだと、NULLは何もないという感覚だったので、id=4とid=5のデータはUNIQUE制約に違反してid=5はINSERTに失敗すると思っていました。
調べてみると、PostgreSQLの一意制約の解説では、
一般に、制約の対象となる列について同じ値を持つ行が、テーブル内に1行を上回る場合は、一意性制約違反になります。 しかし、この比較では2つのNULL値は等価とはみなされません。 つまり、一意性制約があったとしても、制約対象の列の少なくとも1つにNULL値を持つ行を複数格納することができるということです。 この振舞いは標準SQLに準拠していますが、この規則に従わないSQLデータベースがあることを聞いたことがあります。 ですから、移植する予定のアプリケーションを開発する際には注意してください。とあり、NULLは等価ではないとあり、上の例ではid=4とid=5はUNIQUE制約に違反せず、INSERTできるということになります。
文中の
この規則に従わないSQLデータベースがあることを聞いたことがあります。は、MicrosoftのSQL Serverが該当するみたいです。
OracleやMySQLなどはPostgreSQLと同じ挙動をするんだとか。
移植の際などには気をつける必要があります。
対策としては、std列をNOT NULLとして、id=4,id=5には''を入れるようにすれば、意図した動きになります。
では、ADO.NETのDataTableはどうなんでしょう?
こんなサンプルを作って試してみました。 結果はこうなりました。 PostgreSQLとは異なり、NULLを同じ値として扱っているようです。
PostgreSQLにNULLを許可した列を含むUNIQUE制約を持つテーブルからADO.NETのDataTableにデータを取り込んだ場合、エラーになる可能性が考えられます。
UNIQUE制約をかける列は、NOT NULLにするべきでしょうね。

2012年12月7日金曜日
PostgreSQL9.2で同期レプリケーション
ラベル:
PostgreSQL
0
コメント
次のような環境を構築してみようと思います。

OSはすべてubuntu 12.04 LTS Serverを使います。
ビルドに必要なパッケージをインストールします。
PostgreSQLの初期化を行います。
PostgreSQL起動スクリプトをコピーします。
これはpgsql1かpgsql2で障害が発生した時、その対応処理をpgpoolから実行させるためです。
まず、pgpoolで
試しに、pgpoolからpgsql1とpgsql2のコマンドを実行してみて
まず、プライマリのpgsql1の設定を変更します。
続けて、アーカイブログのディレクトリを作成します。
次にセカンダリのpgsql2の設定を変更します。
もし、PostgreSQLが起動しているなら停止します。
同期レプリケーションできているか確認してみます。
pgsql1で次のコマンドを実行して確認します。
サンプルのデータベースを作成してみます。
また、pg_is_in_recovery()の結果が"t"(true)になっていれば、セカンダリとして動作していることが確認できます。
pgpool-IIのディレクトリを作成します。
次に、pgpool.confを設定します。
pgsql1とpgsql2のpg_hba.confを編集して、pgpoolからアクセスできるようにします。
psql1とpsql2で、
sudoの権限のあるユーザーで
pgpoolを起動します。
起動のためのスクリプトをpostgresqlの起動スクリプトを真似して次のように作ってみました。
※完全に理解できていない箇所もあるので、もし真似してやった方がいて何か問題が起きても自己責任でお願いします(^^;
ちなみにubuntuのpgpool2のパッケージをインストールした時に生成される /etc/init.d/pgpool2 は以下のようになっていました。
こっちに合わせて書きなおしたほうがいいかもしれません。
pgpoolを自動起動するように設定します。
ここまでで、設定は完了です。
どうも、pgsql1を落としたあと、次にアクセスがきた時にフェイルオーバー処理が走るみたいです(ちょっと自信はありませんが)。
もう一度アクセスしてみると、
もし、pgsql2がプライマリに昇格できていなければ、更新クエリはエラーになるはずなので、問題なくフェイルオーバー処理が実行されているようです。
念のため、pgsql2の状態を確認してみると
セカンダリのpgsql2を停止させてみます。
もう一度アクセスしてみると、
もし、pgsql1が非同期レプリケーションに切り替わっていなければ、更新クエリはエラーになる(タイムアウトする?)はずなので、ちゃんとフェイルオーバー処理が実行されています。
念のため、pgsqlの/usr/local/pgsql/data/recovery.confを確認してみると、
長ーくなりましたが、これで同期レプリケーションのまとめはここまで。
もし、サーバーの構成で、セカンダリが複数台あったとき、pgpoolに設定したフェイルオーバースクリプトのsecondary failedの部分の処理は不要かと思います。
同期しているセカンダリが落ちたときは sync_state が potential になっているサーバーが、sync になるので問題ないはず。
| 名前 | 役割 |
|---|---|
| pgpool | pgpool2で負荷分散と障害時のフェイルオーバー |
| pgsql1 | PostgreSQL9.2で同期レプリケーションのプライマリ |
| pgsql2 | PostgreSQL9.2で同期レプリケーションのセカンダリ |
[PostgreSQLのセットアップ]
まず、各サーバーにPostgreSQLをソースからビルドしてセットアップします。ビルドに必要なパッケージをインストールします。
sudo apt-get install build_essential libreadline6-dev zlib1g-dev sudo adduser postgres
sudo mkdir /usr/local/pgsql
sudo chown postgres:postgres /usr/local/pgsql
cd /usr/local/src
sudo wget http://ftp.postgresql.org/pub/source/v9.2.1/postgresql-9.2.1.tar.gz
sudo tar zxvf postgresql-9.2.1.tar.gz
sudo chown -R postgres:postgres postgresql-9.2.1
su - postgres
cd /usr/local/source/postgresql-9.2.1
./configure
make
make install
# User specific environment and startup programs
PGHOME=/usr/local/pgsql
PGDATA=$PGHOME/data
PGLIB=$PGHOME/lib
PATH=$PATH:$HOME/bin:$PGHOME/bin
export PGHOME PGDATA PGLIB PATH
source ~/.profile PostgreSQLの初期化を行います。
initdb sudo vi /etc/ld.so.conf sudo ldconfig -v PostgreSQL起動スクリプトをコピーします。
sudo cp /usr/local/src/postgresql-9.2.1/contrib/start-scripts/linux /etc/init.d/postgresql
sudo chmod 755 /etc/init.d/postgresql
sudo update-rc.d postgresql start 90 2 3 4 5 . stop 10 0 1 6 .
sudo /etc/init.d/postgresql start su - postgres
psql -c "alter user postgres with password 'postgresのパスワード';"
[下準備]
pgpoolから、pgsql1,pgsql2のコマンドを、パスワードなしのsshで実行できるようにします。これはpgsql1かpgsql2で障害が発生した時、その対応処理をpgpoolから実行させるためです。
まず、pgpoolで
su - postgres
mkdir .ssh
chmod 700 .ssh
ssh-keygen -t dsa
scp .ssh/id_dsa.pub postgres@pgsql1:~/
scp .ssh/id_dsa.pub postgres@pgsql2:~/
su - postgres
mkdir .ssh
chmod 700 .ssh
cd .ssh
cat ~/id_dsa.pub >> authorized_keys
chmod 600 authorized_keys
rm ~/id_dsa.pub
試しに、pgpoolからpgsql1とpgsql2のコマンドを実行してみて
ssh postgres@pgsql1 "/usr/local/pgsql/bin/psql -l"
                                  List of databases
   Name    |  Owner   | Encoding |   Collate   |    Ctype    |   Access privileges
-----------+----------+----------+-------------+-------------+-----------------------
 postgres  | postgres | UTF8     | ja_JP.UTF-8 | ja_JP.UTF-8 |
 template0 | postgres | UTF8     | ja_JP.UTF-8 | ja_JP.UTF-8 | =c/postgres          +
           |          |          |             |             | postgres=CTc/postgres
 template1 | postgres | UTF8     | ja_JP.UTF-8 | ja_JP.UTF-8 | =c/postgres          +
           |          |          |             |             | postgres=CTc/postgres
(3 rows)

ssh postgres@pgsql2 "/usr/local/pgsql/bin/psql -l"
                                  List of databases
   Name    |  Owner   | Encoding |   Collate   |    Ctype    |   Access privileges
-----------+----------+----------+-------------+-------------+-----------------------
 postgres  | postgres | UTF8     | ja_JP.UTF-8 | ja_JP.UTF-8 |
 template0 | postgres | UTF8     | ja_JP.UTF-8 | ja_JP.UTF-8 | =c/postgres          +
           |          |          |             |             | postgres=CTc/postgres
 template1 | postgres | UTF8     | ja_JP.UTF-8 | ja_JP.UTF-8 | =c/postgres          +
           |          |          |             |             | postgres=CTc/postgres
(3 rows)
[PostgreSQLの同期レプリケーションの設定]
pgsql1をプライマリ、pgsql2をセカンダリという構成で同期レプリケーションするように設定します。まず、プライマリのpgsql1の設定を変更します。
su - postgres
cd /usr/local/pgsql/data
vi postgresql.conf
listen_addresses = '*'
wal_level = hot_standby
archive_mode = on
archive_command= '/bin/cp %p /usr/local/pgsql/data/pg_archive/%f'
max_wal_senders = 3
wal_keep_segments = 5
synchronous_standby_names = 'pgsql2'
cp postgresql.conf postgresql.conf.sync
cp postgresql.conf postgresql.conf.async
#synchronous_standby_names = 'pgsql2' vi pg_hba.conf host replication postgres 192.168.0.0/24 trust
続けて、アーカイブログのディレクトリを作成します。
mkdir -p pg_archive
chmod 700 pg_archive
sudo /etc/init.d/posgresql restart 次にセカンダリのpgsql2の設定を変更します。
もし、PostgreSQLが起動しているなら停止します。
sudo /etc/init.d/postgresql stop su - postgres
cd /usr/local/pgsql
rm -rf data
pg_basebackup -h pgsql1 -p 5432 -D /usr/local/pgsql/data --xlog --progress --verbose
cd data
vi postgresql.conf
#synchronous_standby_names = ''    #をつけてコメントにするか行を削除する
hot_standby = on
cp ../share/recovery.conf.sample recovery.conf
vi recovery.conf
standby_mode = on
primary_conninfo = 'host=pgsql1 port=5432 application_name=pgsql2'
sudo /etc/init.d/posgresql start 同期レプリケーションできているか確認してみます。
pgsql1で次のコマンドを実行して確認します。
su - postgres
psql -c "select application_name, state, sync_priority, sync_state from pg_stat_replication;"
 application_name |   state   | sync_priority | sync_state
------------------+-----------+---------------+------------
 pgsql2           | streaming |             1 | sync
(1 rows)
サンプルのデータベースを作成してみます。
createuser -P test1
createdb test1 -O test1 -E UTF8 -T template0
psql test1 -U test1 -c "create table table1 (id integer not null primary key, value text);"
su - postgres
psql -l
                                  List of databases
   Name    |  Owner   | Encoding |   Collate   |    Ctype    |   Access privileges
-----------+----------+----------+-------------+-------------+-----------------------
 postgres  | postgres | UTF8     | ja_JP.UTF-8 | ja_JP.UTF-8 |
 template0 | postgres | UTF8     | ja_JP.UTF-8 | ja_JP.UTF-8 | =c/postgres          +
           |          |          |             |             | postgres=CTc/postgres
 template1 | postgres | UTF8     | ja_JP.UTF-8 | ja_JP.UTF-8 | =c/postgres          +
           |          |          |             |             | postgres=CTc/postgres
 test1     | test1    | UTF8     | ja_JP.UTF-8 | ja_JP.UTF-8 |
(4 rows)

psql test1 -U test1 -c "\dt;"
         List of relations
 Schema |  Name  | Type  |  Owner
--------+--------+-------+----------
 public | table1 | table | postgres
(1 row)

psql -c "select pg_is_in_recovery();"
 pg_is_in_recovery
-------------------
 t
(1 row)
また、pg_is_in_recovery()の結果が"t"(true)になっていれば、セカンダリとして動作していることが確認できます。
[pgpool-IIの設定]
まず、pgpoolサーバーにpgpool-IIをソースからビルドしてセットアップします。pgpool-IIのディレクトリを作成します。
sudo mkdir /usr/local/pgpool2
sudo chown postgres:postgres /usr/local/pgpool2
cd /usr/local/src
sudo wget http://www.pgpool.net/download.php?f=pgpool-II-3.2.1.tar.gz
sudo tar zxvf pgpool-II-3.2.1.tar.gz
sudo chown -R postgres:postgres pgpool-II-3.2.1
su - postgres
cd /usr/local/source/pgpool-II-3.2.1
./configure --prefix=/usr/local/pgpool2 -with-pgsql=/usr/local/pgsql
make
make install
cd /usr/local/pgpool2/etc
cp pcp.conf.sample pcp.conf
vi pcp.conf
/usr/local/pgpool2/bin/pg_md5 postgresのパスワード # USERID:MD5PASSWD
postgres:MD5変換されたパスワード
次に、pgpool.confを設定します。
cp pgpool.conf.sample-stream pgpool.conf
vi pgpool.conf
listen_addresses = '*'
port = 9999
pid_file_name = '/usr/local/pgpool2/pgpool.pid'

failover_command = '/usr/local/pgpool2/etc/failover.sh %d "%h" %p %D %m %M "%H" %P %r %R'

# pgsql1
backend_hostname0 = 'pgsql1'
backend_port0 = 5432
backend_weight0 = 1
backend_data_directory0 = '/usr/local/pgsql/data'
backend_flag0 = 'ALLOW_TO_FAILOVER'
# pgsql2
backend_hostname1 = 'pgsql2'
backend_port1 = 5432
backend_weight1 = 1
backend_data_directory1 = '/usr/local/pgsql/data'
backend_flag1 = 'ALLOW_TO_FAILOVER‘

sr_check_user = 'postgres'
sr_check_password = 'postgresのパスワード'
health_check_user = 'postgres'
health_check_password = 'postgresのパスワード'
recovery_user = 'postgres'
recovery_password = 'postgresのパスワード'
vi failover.sh #!/bin/sh
failed_node_id=$1
failed_host_name=$2
failed_port=$3
failed_db_cluster=$4
new_master_id=$5
old_master_id=$6
new_master_host_name=$7
old_primary_node_id=$8
new_master_port=$9
new_master_db_cluster=$10
logfile=/usr/local/pgpool2/log/failover.log
echo "------------------------------------------------------------------" >> $logfile
date >> $logfile
echo "failed_node_id=$failed_node_id" >> $logfile
echo "failed_host_name=$failed_host_name" >> $logfile
echo "failed_port=$failed_port" >> $logfile
echo "failed_db_cluster=$failed_db_cluster" >> $logfile
echo "new_master_id=$new_master_id" >> $logfile
echo "old_master_id=$old_master_id" >> $logfile
echo "new_master_host_name=$new_master_host_name" >> $logfile
echo "old_primary_node_id=$old_primary_node_id" >> $logfile
echo "new_master_port=$new_master_port" >> $logfile
echo "new_master_db_cluster=$new_master_db_cluster" >> $logfile
if [ $new_master_id -eq -1 ]
then
echo "unknown new_master_id=$new_master_id" >> $logfile
exit 0
fi
if [ -z $new_master_host_name ]
then
echo "unknown new_master_host_name=$new_master_host_name" >> $logfile
exit 0
fi
if [ $failed_node_id = $old_primary_node_id ] # primary failed
then
echo "secondary promote" >> $logfile
/usr/bin/ssh postgres@$new_master_host_name "/usr/local/pgsql/bin/pg_ctl -D $new_master_db_cluster promote" >> $logfile 2>&1
else # secondary failed
echo "primary async mode" >> $logfile
/usr/bin/ssh postgres@$new_master_host_name "/bin/cp /usr/local/pgsql/data/postgresql.conf.async /usr/local/pgsql/data/postgresql.conf" >> $logfile 2>&1
/usr/bin/ssh postgres@$new_master_host_name "/usr/local/pgsql/bin/pg_ctl reload -D $new_master_db_cluster" >> $logfile 2>&1
fi
cd ..
mkdir log
pgsql1とpgsql2のpg_hba.confを編集して、pgpoolからアクセスできるようにします。
psql1とpsql2で、
su - postgres
cd /usr/local/pgsql/data
vi pg_hba.conf
host all all pgpoolのIPアドレス/32 password
sudoの権限のあるユーザーで
sudo /etc/init.d/postgresql reload pgpoolを起動します。
起動のためのスクリプトをpostgresqlの起動スクリプトを真似して次のように作ってみました。
#! /bin/sh

# Installation prefix
prefix=/usr/local/pgpool2

# Who to run the postmaster as, usually "postgres".  (NOT "root")
PGUSER=postgres

# Where to keep a log file
PGLOG="$prefix/log/serverlog"

# It's often a good idea to protect the postmaster from being killed by the
# OOM killer (which will tend to preferentially kill the postmaster because
# of the way it accounts for shared memory).  Setting the OOM_SCORE_ADJ value
# to -1000 will disable OOM kill altogether.  If you enable this, you probably
# want to compile PostgreSQL with "-DLINUX_OOM_SCORE_ADJ=0", so that
# individual backends can still be killed by the OOM killer.
#OOM_SCORE_ADJ=-1000
# Older Linux kernels may not have /proc/self/oom_score_adj, but instead
# /proc/self/oom_adj, which works similarly except the disable value is -17.
# For such a system, enable this and compile with "-DLINUX_OOM_ADJ=0".
#OOM_ADJ=-17

## STOP EDITING HERE

# The path that is to be used for the script
PATH=/usr/local/sbin:/usr/local/bin:/sbin:/bin:/usr/sbin:/usr/bin

# What to use to start up the pgpool.
DAEMON="$prefix/bin/pgpool"

# What to use to shut down the pgpool
PGPOOL="$prefix/bin/pgpool"

set –e

# Only start if we can find the pgpool.
test -x $DAEMON ||
{
        echo "$DAEMON not found"
        if [ "$1" = "stop" ]
        then exit 0
        else exit 5
        fi
}

# Parse command line parameters.
case $1 in
  start)
        echo -n "Starting pgpool-II: "
        test x"$OOM_SCORE_ADJ" != x && echo "$OOM_SCORE_ADJ" > /proc/self/oom_score_adj
        test x"$OOM_ADJ" != x && echo "$OOM_ADJ" > /proc/self/oom_adj
        su - $PGUSER -c "$DAEMON &" >>$PGLOG 2>&1
        echo "ok"
        ;;
  stop)
        echo -n "Stopping pgpool-II: "
        su - $PGUSER -c "$PGPOOL -m fast stop"
        echo "ok"
        ;;
  restart)
        echo -n "Restarting pgpool-II: "
        su - $PGUSER -c "$PGPOOL -m fast stop"
        test x"$OOM_SCORE_ADJ" != x && echo "$OOM_SCORE_ADJ" > /proc/self/oom_score_adj
        test x"$OOM_ADJ" != x && echo "$OOM_ADJ" > /proc/self/oom_adj
        su - $PGUSER -c "$DAEMON &" >>$PGLOG 2>&1
        echo "ok"
        ;;
 reload)
        echo -n "Reload pgpool-II: "
        su - $PGUSER -c "$PGPOOL reload"
        echo "ok"
        ;;
  *)
        # Print help
        echo "Usage: $0 {start|stop|reload|restart}" 1>&2
        exit 1
        ;;
esac

exit 0
※完全に理解できていない箇所もあるので、もし真似してやった方がいて何か問題が起きても自己責任でお願いします(^^;
ちなみにubuntuのpgpool2のパッケージをインストールした時に生成される /etc/init.d/pgpool2 は以下のようになっていました。
#! /bin/sh

### BEGIN INIT INFO
# Provides:          pgpool2
# Required-Start:    $remote_fs $syslog
# Required-Stop:     $remote_fs $syslog
# Should-Start:      postgresql
# Default-Start:     2 3 4 5
# Default-Stop:      0 1 6
# Short-Description: start pgpool-II
# Description: pgpool-II is a connection pool server and replication
#              proxy for PostgreSQL.
### END INIT INFO


PATH=/sbin:/bin:/usr/sbin:/usr/bin
DAEMON=/usr/sbin/pgpool
PIDFILE=/var/run/postgresql/pgpool.pid

test -x $DAEMON || exit 5

# Include pgpool defaults if available
if [ -f /etc/default/pgpool2 ] ; then
 . /etc/default/pgpool2
fi

OPTS=""
if [ x"$PGPOOL_LOG_DEBUG" = x"yes" ]; then
 OPTS="$OPTS -d"
fi

. /lib/lsb/init-functions


is_running() {
 pidofproc -p $PIDFILE $DAEMON >/dev/null
}


d_start() {
 if is_running; then
  :
 else
  su -c "$DAEMON -n $OPTS 2>&1 </dev/null | logger -t pgpool -p ${PGPOOL_SYSLOG_FACILITY:-local0}.info >/dev/null 2>&1 &" - postgres
 fi
}


d_stop() {
 killproc -p $PIDFILE $DAEMON -INT
 status=$?
 [ $status -eq 0 ] || [ $status -eq 3 ]
 return $?
}


case "$1" in
    start)
 log_daemon_msg "Starting pgpool-II" pgpool
 d_start
 log_end_msg $?
 ;;
    stop)
 log_daemon_msg "Stopping pgpool-II" pgpool
 d_stop
 log_end_msg $?
 ;;
    status)
 is_running
 status=$?
 if [ $status -eq 0 ]; then
  log_success_msg "pgpool-II is running."
 else
  log_failure_msg "pgpool-II is not running."
 fi
 exit $status
 ;;
    restart|force-reload)
 log_daemon_msg "Restarting pgpool-II" pgpool
 d_stop && sleep 1 && d_start
 log_end_msg $?
 ;;
    try-restart)
 if $0 status >/dev/null; then
  $0 restart
 else
  exit 0
 fi
 ;;
    reload)
 exit 3
 ;;
    *)
 log_failure_msg "Usage: $0 {start|stop|status|restart|try-restart|reload|force-reload}"
 exit 2
 ;;
esac
こっちに合わせて書きなおしたほうがいいかもしれません。
pgpoolを自動起動するように設定します。
sudo chmod 755 /etc/init.d/pgpool
sudo update-rc.d pgpool start 91 2 3 4 5 . stop 11 0 1 6 .
sudo /etc/init.d/pgpool start ここまでで、設定は完了です。
[pgsql1を落とすテスト]
プライマリのpgsql1を停止させてみます。su - postgres
pg_ctl -D /usr/local/pgsql/data -m immediate stop
psql -h pgpool -p 9999 -U test1 test1
psql: server closed the connection unexpectedly
        This probably means the server terminated abnormally
        before or while processing the request.
どうも、pgsql1を落としたあと、次にアクセスがきた時にフェイルオーバー処理が走るみたいです(ちょっと自信はありませんが)。
もう一度アクセスしてみると、
psql -h pgpool -p 9999 -U test1 test1
Password for user test1: test1のパスワード

test1=> select * from table1;
 id | value
----+-------
(0 row)

test1=> insert into table1 (id, value) values (1, 'aaaa');
INSERT 0 1
もし、pgsql2がプライマリに昇格できていなければ、更新クエリはエラーになるはずなので、問題なくフェイルオーバー処理が実行されているようです。
念のため、pgsql2の状態を確認してみると
psql -c "select pg_is_in_recovery();"
 pg_is_in_recovery
-------------------
 f
(1 row)
[pgsql2を落とすテスト]
※一旦pgsql1とpsql2を元に戻します。セカンダリのpgsql2を停止させてみます。
su - postgresql
pg_ctl -D /usr/local/pgsql/data -m immediate stop
psql -h pgpool -p 9999 -U test1 test1
psql: server closed the connection unexpectedly
        This probably means the server terminated abnormally
        before or while processing the request.
もう一度アクセスしてみると、
psql -h pgpool -p 9999 -U test1 test1
Password for user test1: test1のパスワード

test1=> select * from table1;
 id | value
----+-------
(0 row)

test1=> insert into table1 (id, value) values (1, 'aaaa');
INSERT 0 1
もし、pgsql1が非同期レプリケーションに切り替わっていなければ、更新クエリはエラーになる(タイムアウトする?)はずなので、ちゃんとフェイルオーバー処理が実行されています。
念のため、pgsqlの/usr/local/pgsql/data/recovery.confを確認してみると、
#synchronous_standby_names = 'pgsql2' 長ーくなりましたが、これで同期レプリケーションのまとめはここまで。
もし、サーバーの構成で、セカンダリが複数台あったとき、pgpoolに設定したフェイルオーバースクリプトのsecondary failedの部分の処理は不要かと思います。
同期しているセカンダリが落ちたときは sync_state が potential になっているサーバーが、sync になるので問題ないはず。
2012年9月28日金曜日
PostgreSQLの列の型のtimestamp with time zoneとNpgsqlでのアクセス
ラベル:
ADO.NET
,
PostgreSQL
0
コメント
昨日のエントリで、PostgreSQLのtimestamp型のwith time zoneについて色々試してみましたが、もう少し調べてayakobabaの日記というブログの[Postgresql]Postgresql のTimezoneというエントリを見つけました。
PostgreSQLのマニュアルにも記述があり、timestamp with time zone型の列にアクセスするとき、at time zone構文を使うことでタイムスタンプを異なる時間帯に変換できるようです。 例えば、こんな感じ。
そこで、昨日のコードを修正して、次のようにしてみました。
ポイントは、DataAdapterのSelectCommand,InsertCommand,UpdateCommandのそれぞれのSQLで、datetime2の列にアクセスするところで、at time zone構文を使っているところです。
SelectCommandでは、datetime2の値を取得するところで、
この'+09:00'は、
InsertCommandでは
まず、クライアントPCのタイムゾーンを東京、サーバーのタイムゾーンも東京の状態で実行してみると
データの追加が終わったところ(にブレークポイントをいれて確認)で、コンソールに
そのまま処理を続けて、次の更新処理が終わったところで、コンソールに
次に、サーバー側のタイムゾーンを台北に変更して、同じ事をやってみます。
データの追加処理が終わったところでは、コンソールに
あれれれ、予定では追加処理のあと、datetime2の値は、コンソールでは2012/10/01 09:00:00と表示され、データベース側のtable1のdatetime2の値は、2012-10-01 08:00:00+08になっているはずなのに、2時間ズレているようです。
原因を調べるために、追加処理で実際に実行されたSQLを調べてみると、
datetime2の値となる
これで2時間のズレが発生しているようです。
ようするに、
そうなると、今回のコードで問題になるのは、InsertCommandとUpdateCommandのdatetime2に対するパラメータの型ということになります。
コードを修正して、もう一度、クライアントは東京、サーバーは台北という状態で実行してみます。
追加処理が終わったところで、コンソールには
これで予定通りの処理となりました。
念のため、クライアントのタイムゾーンを台北、サーバーのタイムゾーンを東京にして同じ処理を実行してみます。
追加処理が終わると、コンソールに
これで、クライアント側のプログラムでの日時は、クライアントのタイムゾーンに従った日時が入り、データベース上の日時は、UTC(with time zone)で入るようにできそうです。
一応、修正したソースを載せておきます。
PostgreSQLのマニュアルにも記述があり、timestamp with time zone型の列にアクセスするとき、at time zone構文を使うことでタイムスタンプを異なる時間帯に変換できるようです。 例えば、こんな感じ。
そこで、昨日のコードを修正して、次のようにしてみました。
ポイントは、DataAdapterのSelectCommand,InsertCommand,UpdateCommandのそれぞれのSQLで、datetime2の列にアクセスするところで、at time zone構文を使っているところです。
SelectCommandでは、datetime2の値を取得するところで、
datetime2 at time zone interval '+09:00' as datetime2 この'+09:00'は、
DateTime tmpTime = new DateTime(2000, 1, 1);
TimeSpan diffUTC = tmpTime - tmpTime.ToUniversalTime();
string strDiffUTC = (diffUTC.TotalHours >= 0 ? "+" : "") + diffUTC.Hours.ToString("00") + ":" + diffUTC.Minutes.ToString("00");
InsertCommandでは
:datetime2 at time zone interval '+09:00'
datetime2=:datetime2 at time zone interval '+09:00'
まず、クライアントPCのタイムゾーンを東京、サーバーのタイムゾーンも東京の状態で実行してみると
データの追加が終わったところ(にブレークポイントをいれて確認)で、コンソールに
id=1, datetime1=2012/10/01 9:00:00, datetime2=2012/10/01 9:00:00
db1=> select * from table1;
 id |      datetime1      |       datetime2
----+---------------------+------------------------
  1 | 2012-10-01 09:00:00 | 2012-10-01 09:00:00+09
(1 row)
そのまま処理を続けて、次の更新処理が終わったところで、コンソールに
id=1, datetime1=2012/12/01 9:00:00, datetime2=2012/12/01 9:00:00
db1=> select * from table1;
 id |      datetime1      |       datetime2
----+---------------------+------------------------
  1 | 2012-12-01 09:00:00 | 2012-12-01 09:00:00+09
(1 row)
次に、サーバー側のタイムゾーンを台北に変更して、同じ事をやってみます。
データの追加処理が終わったところでは、コンソールに
id=1, datetime1=2012/10/01 9:00:00, datetime2=2012/10/01 11:00:00
db1=> select * from table1;
 id |      datetime1      |       datetime2
----+---------------------+------------------------
  1 | 2012-10-01 09:00:00 | 2012-10-01 10:00:00+08
(1 row)
id=1, datetime1=2012/12/01 9:00:00, datetime2=2012/12/01 11:00:00
db1=> select * from table1;
 id |      datetime1      |       datetime2
----+---------------------+------------------------
  1 | 2012-12-01 09:00:00 | 2012-12-01 10:00:00+08
あれれれ、予定では追加処理のあと、datetime2の値は、コンソールでは2012/10/01 09:00:00と表示され、データベース側のtable1のdatetime2の値は、2012-10-01 08:00:00+08になっているはずなのに、2時間ズレているようです。
原因を調べるために、追加処理で実際に実行されたSQLを調べてみると、
insert into table1 (
  id
, datetime1
, datetime2
) values (
  ((1)::int4)
, ((E'2012-10-01 09:00:00.000000')::timestamp)
, ((E'2012-10-01 09:00:00.000000')::timestamptz) at time zone interval '+09:00'
)
datetime2の値となる
((E'2012-10-01 09:00:00.000000')::timestamptz) at time zone interval '+09:00' これで2時間のズレが発生しているようです。
ようするに、
db1=> select timestamp with time zone '2012-10-01 9:00:00' at time zone interval '+09:00';
      timezone
---------------------
 2012-10-01 10:00:00
(1 row)

db1=> select timestamp without time zone '2012-10-01 9:00:00' at time zone interval '+09:00';
        timezone
------------------------
 2012-10-01 08:00:00+08
(1 row)
そうなると、今回のコードで問題になるのは、InsertCommandとUpdateCommandのdatetime2に対するパラメータの型ということになります。
da.InsertCommand.Parameters.Add(new Npgsql.NpgsqlParameter("datetime2", NpgsqlTypes.NpgsqlDbType.TimestampTZ, 0, "datetime2", ParameterDirection.Input, true , 0, 0, DataRowVersion.Current, DBNull.Value)); da.InsertCommand.Parameters.Add(new Npgsql.NpgsqlParameter("datetime2", NpgsqlTypes.NpgsqlDbType.Timestamp, 0, "datetime2", ParameterDirection.Input, true , 0, 0, DataRowVersion.Current, DBNull.Value)); コードを修正して、もう一度、クライアントは東京、サーバーは台北という状態で実行してみます。
追加処理が終わったところで、コンソールには
id=1, datetime1=2012/10/01 9:00:00, datetime2=2012/10/01 9:00:00
db1=> select * from table1;
 id |      datetime1      |       datetime2
----+---------------------+------------------------
  1 | 2012-10-01 09:00:00 | 2012-10-01 08:00:00+08
(1 row)
id=1, datetime1=2012/12/01 9:00:00, datetime2=2012/12/01 9:00:00
db1=> select * from table1;
 id |      datetime1      |       datetime2
----+---------------------+------------------------
  1 | 2012-12-01 09:00:00 | 2012-12-01 08:00:00+08
(1 row)
これで予定通りの処理となりました。
念のため、クライアントのタイムゾーンを台北、サーバーのタイムゾーンを東京にして同じ処理を実行してみます。
追加処理が終わると、コンソールに
id=1, datetime1=2012/10/01 9:00:00, datetime2=2012/10/01 9:00:00
db1=> select * from table1;
 id |      datetime1      |       datetime2
----+---------------------+------------------------
  1 | 2012-10-01 09:00:00 | 2012-10-01 10:00:00+09
(1 row)
id=1, datetime1=2012/12/01 9:00:00, datetime2=2012/12/01 9:00:00
db1=> select * from table1;
 id |      datetime1      |       datetime2
----+---------------------+------------------------
  1 | 2012-12-01 09:00:00 | 2012-12-01 10:00:00+09
(1 row)
これで、クライアント側のプログラムでの日時は、クライアントのタイムゾーンに従った日時が入り、データベース上の日時は、UTC(with time zone)で入るようにできそうです。
一応、修正したソースを載せておきます。
using System;
using System.Collections.Generic;
using System.Text;
using System.Data;

namespace pgTimestamp
{
    class Program
    {
        static void Main(string[] args)
        {
            // データベース接続
            Npgsql.NpgsqlConnection conn = new Npgsql.NpgsqlConnection("Server=xxxx;"
                                                                     + "Port=5432;"
                                                                     + "User Id=yyyy;"
                                                                     + "Password=zzzz;"
                                                                     + "Database=db1;"
                                                                     + "Pooling=false;"
                                                                     + "Encoding=UNICODE;");
            // データベース接続
            try
            {
                conn.Open();
            }
            catch (Exception ex)
            {
                Console.WriteLine(ex.Message);
                Console.ReadKey();
                return;
            }

            // クライアントの時間とUTCとの差を取得
            DateTime tmpTime = new DateTime(2000, 1, 1);             // 適当な日時をセットして
            TimeSpan diffUTC = tmpTime - tmpTime.ToUniversalTime();  // UTCとの差を取得
            string strDiffUTC = (diffUTC.TotalHours >= 0 ? "+" : "") + diffUTC.Hours.ToString("00") + ":" + diffUTC.Minutes.ToString("00");

            // テーブルの生成
            DataTable table1 = new DataTable("table1");
            table1.Columns.Add(new DataColumn("id"       , typeof(int)     ));
            table1.Columns.Add(new DataColumn("datetime1", typeof(DateTime)));
            table1.Columns.Add(new DataColumn("datetime2", typeof(DateTime)));
            table1.PrimaryKey = new DataColumn[] { table1.Columns["id"] };

            // データアダプタの生成
            Npgsql.NpgsqlDataAdapter da = new Npgsql.NpgsqlDataAdapter();
            da.SelectCommand = new Npgsql.NpgsqlCommand
            (
                   "select"
                +     " id"
                +    ", datetime1"
                +    ", datetime2 at time zone interval '" + strDiffUTC + "' as datetime2"
                + " from"
                +     " table1"
                , conn
            );
            da.InsertCommand = new Npgsql.NpgsqlCommand
            (
                  "insert into table1 ("
                +      "id"
                +    ", datetime1"
                +    ", datetime2"
                + ") values ("
                +      ":id"
                +    ", :datetime1"
                +    ", :datetime2 at time zone interval '" + strDiffUTC + "'"
                + ")"
                , conn
            );
            da.InsertCommand.Parameters.Add(new Npgsql.NpgsqlParameter("id"       , NpgsqlTypes.NpgsqlDbType.Integer  , 0, "id"       , ParameterDirection.Input, false, 0, 0, DataRowVersion.Current, DBNull.Value));
            da.InsertCommand.Parameters.Add(new Npgsql.NpgsqlParameter("datetime1", NpgsqlTypes.NpgsqlDbType.Timestamp, 0, "datetime1", ParameterDirection.Input, true , 0, 0, DataRowVersion.Current, DBNull.Value));
            da.InsertCommand.Parameters.Add(new Npgsql.NpgsqlParameter("datetime2", NpgsqlTypes.NpgsqlDbType.Timestamp, 0, "datetime2", ParameterDirection.Input, true , 0, 0, DataRowVersion.Current, DBNull.Value));
            da.UpdateCommand = new Npgsql.NpgsqlCommand
            (
                   "update table1 set"
                +     " id=:id"
                +    ", datetime1=:datetime1"
                +    ", datetime2=:datetime2 at time zone interval '" + strDiffUTC + "'"
                + " where"
                +     " id=:org_id"
                , conn
            );
            da.UpdateCommand.Parameters.Add(new Npgsql.NpgsqlParameter("id"       , NpgsqlTypes.NpgsqlDbType.Integer  , 0, "id"       , ParameterDirection.Input, false, 0, 0, DataRowVersion.Current , DBNull.Value));
            da.UpdateCommand.Parameters.Add(new Npgsql.NpgsqlParameter("datetime1", NpgsqlTypes.NpgsqlDbType.Timestamp, 0, "datetime1", ParameterDirection.Input, true , 0, 0, DataRowVersion.Current , DBNull.Value));
            da.UpdateCommand.Parameters.Add(new Npgsql.NpgsqlParameter("datetime2", NpgsqlTypes.NpgsqlDbType.Timestamp, 0, "datetime2", ParameterDirection.Input, true , 0, 0, DataRowVersion.Current , DBNull.Value));
            da.UpdateCommand.Parameters.Add(new Npgsql.NpgsqlParameter("org_id"   , NpgsqlTypes.NpgsqlDbType.Integer  , 0, "id"       , ParameterDirection.Input, false, 0, 0, DataRowVersion.Original, DBNull.Value));
            da.DeleteCommand = new Npgsql.NpgsqlCommand
            (
                   "delete from table1"
                + " where"
                +     " id=:org_id"
                , conn
            );
            da.DeleteCommand.Parameters.Add(new Npgsql.NpgsqlParameter("org_id"   , NpgsqlTypes.NpgsqlDbType.Integer    , 0, "id"       , ParameterDirection.Input, false, 0, 0, DataRowVersion.Original, DBNull.Value));

            // データの取得
            da.Fill(table1);
            // データの一旦削除
            try
            {
                foreach (DataRow row in table1.Rows)
                {
                    row.Delete();
                }
                Update(conn, da, table1);
            }
            catch (Exception ex)
            {
                Console.WriteLine(ex.Message);
                Console.ReadKey();
                return;
            }

            // データの追加
            DateTime value = DateTime.Parse("2012-10-01 09:00:00");
            DataRow newRow = table1.NewRow();
            newRow["id"       ] = 1;
            newRow["datetime1"] = value;
            newRow["datetime2"] = value;
            table1.Rows.Add(newRow);
            // 保存
            try
            {
                Update(conn, da, table1);
            }
            catch (Exception ex)
            {
                Console.WriteLine(ex.Message);
                Console.ReadKey();
                return;
            }
            // テーブルを一旦クリアして取得し直す
            table1.Rows.Clear();
            da.Fill(table1);
            // テーブル内容の表示
            Show(table1);

            // データの更新
            value = DateTime.Parse("2012-12-01 09:00:00");
            table1.Rows[0]["datetime1"] = value;
            table1.Rows[0]["datetime2"] = value;
            // 保存
            try
            {
                Update(conn, da, table1);
            }
            catch (Exception ex)
            {
                Console.WriteLine(ex.Message);
                Console.ReadKey();
                return;
            }
            // テーブルを一旦クリアして取得し直す
            table1.Rows.Clear();
            da.Fill(table1);
            // テーブル内容の表示
            Show(table1);

            // データベース切断
            try
            {
                conn.Close();
            }
            catch (Exception ex)
            {
                Console.WriteLine(ex.Message);
            }
            Console.ReadKey();
        }

        /// <summary>
        /// データの保存
        /// </summary>
        /// <param name="conn">データベース接続子</param>
        /// <param name="da">データアダプタ</param>
        /// <param name="table1">データテーブル</param>
        static private void Update(Npgsql.NpgsqlConnection conn, Npgsql.NpgsqlDataAdapter da, DataTable table1)
        {
            // トランザクション開始
            Npgsql.NpgsqlTransaction tran = null;
            try
            {
                tran = conn.BeginTransaction();
                da.InsertCommand.Transaction = tran;
                da.UpdateCommand.Transaction = tran;
                da.DeleteCommand.Transaction = tran;
            }
            catch
            {
                throw;
            }

            // 保存
            try
            {
                da.Update(table1);
            }
            catch
            {
                tran.Rollback();
                throw;
            }

            // コミット
            try
            {
                tran.Commit();
            }
            catch
            {
                throw;
            }
        }

        /// <summary>
        /// テーブルの内容を表示
        /// </summary>
        /// <param name="table1">データテーブル</param>
        static private void Show(DataTable table1)
        {
            foreach (DataRow row in table1.Rows)
            {
                Console.WriteLine("id=" + row["id"].ToString()
                              + ", datetime1=" + ((DateTime)row["datetime1"]).ToString()
                              + ", datetime2=" + ((DateTime)row["datetime2"]).ToString());
            }
        }
    }
}
2012年9月27日木曜日
PostgreSQLの列の型のtimestampのtime zoneについて
ラベル:
ADO.NET
,
PostgreSQL
0
コメント
PostgreSQLの列をtimestamp with time zoneで定義して、Npgsqlでアクセスした時、どんなふうになるのか気になったのでテスト。
PostgreSQLの動いている環境はこんな感じ。
ここにdb1というデータベースを作成して、確認用のテーブルtable1を作成します。
C#で次のコードを実行して、table1の内容を取得してみます。
ここで、サーバー側のタイムゾーンを台北に変更してみます。
ここで、先ほどのC#のコードを実行してみると
datetime2の値は、タイムゾーンが東京での時間になっています。
ここで、C#のコードを実行しているPCのタイムゾーンの設定を台北に変更してみます。
 この状態で、コードを実行してみると
ただ、このときToUniversalTime()で取得した時間は、どのパターンでも同じ時間となっています。
今度は、サーバー側のタイムゾーンを東京に戻してPostgreSQLを再起動します。
ここでPCのタイムゾーンも東京に戻します。
今度は、C#のコードでtable1に行を追加してみます。
次のようなコードを用意します。
ここで、一旦id=2のレコードを削除します。
さらに、今度はクライアント側のタイムゾーンを台北にしてやってみると、
サーバー側から見ると、クライアントのタイムゾーンがなんであっても、9:00としてinsertされたら、それはサーバー側のタイムゾーンでの時刻としてinsertされるようです。
念のため、今度はサーバー側のタイムゾーンを東京に戻して(クライアントのタイムゾーンは台北のまま)やってみると、
datetiime2の列の値を表にしてみると
となり、クライアントのタイムゾーンがなんであっても、サーバー側には9:00でinsertされ、それをクライアント側が取得するときは、サーバー側のタイムゾーンでの9:00をクライアント側のタイムゾーンでの時間にして取得されています。
ここで、少し気になるのが、C#のコードの中のDataAdapterのInsertCommandのNpgsqlParameterの設定で、
試してみると、
となり、全く同じ結果となりました。
NpgsqlDbType.TimestampTZとNpgsqlDbType.Timestampの使い分けがよくわからない感じですが、PostgreSQL側のテーブルの列がtimestamp with time zoneなら、NpgsqlDbType.TimestampTZを使って、timestamp without time zoneならNpgsqlDbType.Timestampを使っておけばいいのかな。
ただ、私のイメージしていた動きだと、C#のコードでDateTimeの時刻に9:00と入っていて、それをデータベースに書き込み、さらに読みなおしたときは9:00になっていて欲しい感じです。
テーブルの列の型がTimestamp with time zoneで、且つNpgsqlCommandのパラメータの型をNpgsqlDbType.TimestampTZにしているなら、サーバー側に書き込まれる時刻のUTCはクライアントの書き込もうとしている時刻のUTCと一致するようになるようなイメージ。そうだとクライアント側はサーバーのタイムゾーンを意識しなくてもいい気がするんだけど。。。もしかして、私が気がついていなくて考え方が間違っているのかな(^^;
追記:別のエントリで、もう少しツッコんで解決方法を考えてみました。
PostgreSQLの動いている環境はこんな感じ。
$ psql --version
psql (PostgreSQL) 8.3.10
contains support for command-line editing
$ cat /etc/lsb-release
DISTRIB_ID=Ubuntu
DISTRIB_RELEASE=8.04
DISTRIB_CODENAME=hardy
DISTRIB_DESCRIPTION="Ubuntu 8.04.4 LTS"
ここにdb1というデータベースを作成して、確認用のテーブルtable1を作成します。
$ createdb db1
$ psql db1

db1=> create table table1
db1-> (
db1(>     id integer not null primary key
db1(>   , datetime1 timestamp without time zone
db1(>   , datetime2 timestamp with time zone
db1(> );
NOTICE:  CREATE TABLE / PRIMARY KEY will create implicit index "table1_pkey" for table "table1"
CREATE TABLE
db1=> insert into table1(id, datetime1, datetime2) values (1, current_timestamp, current_timestamp);
INSERT 0 1
db1=> select * from table1;
 id |         datetime1          |           datetime2
----+----------------------------+-------------------------------
  1 | 2012-09-27 11:23:28.487888 | 2012-09-27 11:23:28.487888+09
(1 row)
C#で次のコードを実行して、table1の内容を取得してみます。
using System;
using System.Collections.Generic;
using System.Text;
using System.Data;

namespace pgTimestamp
{
    class Program
    {
        static void Main(string[] args)
        {
            // データベース接続
            Npgsql.NpgsqlConnection conn = new Npgsql.NpgsqlConnection("Server=xxxx;"
                                                                     + "Port=5432;"
                                                                     + "User Id=yyyy;"
                                                                     + "Password=zzzz;"
                                                                     + "Database=db1;"
                                                                     + "Pooling=false;"
                                                                     + "Encoding=UNICODE;");
            try
            {
                conn.Open();
            }
            catch (Exception ex)
            {
                Console.WriteLine(ex.Message);
                Console.ReadKey();
                return;
            }

            // テーブルの生成
            DataTable table1 = new DataTable("table1");
            table1.Columns.Add(new DataColumn("id"       , typeof(int)     ));
            table1.Columns.Add(new DataColumn("datetime1", typeof(DateTime)));
            table1.Columns.Add(new DataColumn("datetime2", typeof(DateTime)));
            table1.PrimaryKey = new DataColumn[] { table1.Columns["id"] };

            // データの取得
            Npgsql.NpgsqlDataAdapter da = new Npgsql.NpgsqlDataAdapter();
            da.SelectCommand = new Npgsql.NpgsqlCommand("select id, datetime1, datetime2 from table1", conn);
            da.Fill(table1);

            // 取得したデータの表示
            foreach (DataRow row in table1.Rows)
            {
                Console.WriteLine("id=" + row["id"].ToString()
                              + ", datetime1=" + ((DateTime)row["datetime1"]).ToString()
                              + ", datetime2=" + ((DateTime)row["datetime2"]).ToString());
                Console.WriteLine("dateTime2(UTC)=" + ((DateTime)row["datetime2"]).ToUniversalTime().ToString());
            }
            // データベース切断
            try
            {
                conn.Close();
            }
            catch (Exception ex)
            {
                Console.WriteLine(ex.Message);
            }
            Console.ReadKey();
        }
    }
}
id=1, datetime1=2012/09/27 11:23:28, datetime2=2012/09/27 11:23:28
dateTime2(UTC)=2012/09/27 2:23:28
ここで、サーバー側のタイムゾーンを台北に変更してみます。
$ sudo dpkg-reconfigure tzdata

Current default timezone: 'Asia/Taipei'
Local time is now:      Thu Sep 27 10:34:32 CST 2012.
Universal Time is now:  Thu Sep 27 02:34:32 UTC 2012.
sudo /etc/init.d/postgresql-8.3 restart
$ psql db1

db1=> select * from table1;
 id |         datetime1          |           datetime2
----+----------------------------+-------------------------------
  1 | 2012-09-27 11:23:28.487888 | 2012-09-27 10:23:28.487888+08
(1 row)
ここで、先ほどのC#のコードを実行してみると
id=1, datetime1=2012/09/27 11:23:28, datetime2=2012/09/27 11:23:28
dateTime2(UTC)=2012/09/27 2:23:28
datetime2の値は、タイムゾーンが東京での時間になっています。
ここで、C#のコードを実行しているPCのタイムゾーンの設定を台北に変更してみます。
id=1, datetime1=2012/09/27 11:23:28, datetime2=2012/09/27 10:23:28
dateTime2(UTC)=2012/09/27 2:23:28
ただ、このときToUniversalTime()で取得した時間は、どのパターンでも同じ時間となっています。
今度は、サーバー側のタイムゾーンを東京に戻してPostgreSQLを再起動します。
$ sudo dpkg-reconfigure tzdata

Current default timezone: 'Asia/Tokyo'
Local time is now:      Thu Sep 27 11:52:27 JST 2012.
Universal Time is now:  Thu Sep 27 02:52:27 UTC 2012.

$ sudo /etc/init.d/postgresql-8.3 restart
id=1, datetime1=2012/09/27 11:23:28, datetime2=2012/09/27 10:23:28
dateTime2(UTC)=2012/09/27 2:23:28
ここでPCのタイムゾーンも東京に戻します。
今度は、C#のコードでtable1に行を追加してみます。
次のようなコードを用意します。
using System;
using System.Collections.Generic;
using System.Text;
using System.Data;

namespace pgTimestamp
{
    class Program
    {
        static void Main(string[] args)
        {
            // データベース接続
            Npgsql.NpgsqlConnection conn = new Npgsql.NpgsqlConnection("Server=xxxx;"
                                                                     + "Port=5432;"
                                                                     + "User Id=yyyy;"
                                                                     + "Password=zzzz;"
                                                                     + "Database=db1;"
                                                                     + "Pooling=false;"
                                                                     + "Encoding=UNICODE;");
            try
            {
                conn.Open();
            }
            catch (Exception ex)
            {
                Console.WriteLine(ex.Message);
                Console.ReadKey();
                return;
            }

            // テーブルの生成
            DataTable table1 = new DataTable("table1");
            table1.Columns.Add(new DataColumn("id"       , typeof(int)     ));
            table1.Columns.Add(new DataColumn("datetime1", typeof(DateTime)));
            table1.Columns.Add(new DataColumn("datetime2", typeof(DateTime)));
            table1.PrimaryKey = new DataColumn[] { table1.Columns["id"] };

            // データの取得
            Npgsql.NpgsqlDataAdapter da = new Npgsql.NpgsqlDataAdapter();
            da.SelectCommand = new Npgsql.NpgsqlCommand("select id, datetime1, datetime2 from table1", conn);
            da.Fill(table1);

            // データの追加
            da.InsertCommand = new Npgsql.NpgsqlCommand
            (
                  "insert into table1 ("
                +      "id"
                +    ", datetime1"
                +    ", datetime2"
                + ") values ("
                +     " :id"
                +    ", :datetime1"
                +    ", :datetime2"
                + ")"
                , conn
            );
            da.InsertCommand.Parameters.Add(new Npgsql.NpgsqlParameter("id"       , NpgsqlTypes.NpgsqlDbType.Integer    , 0, "id"       , ParameterDirection.Input, false, 0, 0, DataRowVersion.Current, DBNull.Value));
            da.InsertCommand.Parameters.Add(new Npgsql.NpgsqlParameter("datetime1", NpgsqlTypes.NpgsqlDbType.Timestamp  , 0, "datetime1", ParameterDirection.Input, true , 0, 0, DataRowVersion.Current, DBNull.Value));
            da.InsertCommand.Parameters.Add(new Npgsql.NpgsqlParameter("datetime2", NpgsqlTypes.NpgsqlDbType.TimestampTZ, 0, "datetime2", ParameterDirection.Input, true , 0, 0, DataRowVersion.Current, DBNull.Value));

            DateTime value = DateTime.Parse("2012-10-01 09:00:00");
            DataRow newRow = table1.NewRow();
            newRow["id"       ] = 2;
            newRow["datetime1"] = value;
            newRow["datetime2"] = value;
            table1.Rows.Add(newRow);

            // トランザクション開始
            Npgsql.NpgsqlTransaction tran = null;
            try
            {
                tran = conn.BeginTransaction();
                da.InsertCommand.Transaction = tran;
            }
            catch (Exception ex)
            {
                Console.WriteLine(ex.Message);
                Console.ReadKey();
                return;
            }

            // 保存
            try
            {
                da.Update(table1);
            }
            catch (Exception ex)
            {
                tran.Rollback();
                Console.WriteLine(ex.Message);
                Console.ReadKey();
                return;
            }

            // コミット
            try
            {
                tran.Commit();
            }
            catch (Exception ex)
            {
                Console.WriteLine(ex.Message);
                Console.ReadKey();
                return;
            }

            // データベースからtable1の内容を取得しなおす
            table1.Rows.Clear();
            da.Fill(table1);

            // 取得したデータの表示
            foreach (DataRow row in table1.Rows)
            {
                Console.WriteLine("id=" + row["id"].ToString()
                              + ", datetime1=" + ((DateTime)row["datetime1"]).ToString()
                              + ", datetime2=" + ((DateTime)row["datetime2"]).ToString());
                Console.WriteLine("dateTime2(UTC)=" + ((DateTime)row["datetime2"]).ToUniversalTime().ToString());
            }

            // データベース切断
            try
            {
                conn.Close();
            }
            catch (Exception ex)
            {
                Console.WriteLine(ex.Message);
            }
            Console.ReadKey();
        }
    }
}
id=1, datetime1=2012/09/27 11:23:28, datetime2=2012/09/27 11:23:28
dateTime2(UTC)=2012/09/27 2:23:28
id=2, datetime1=2012/10/01 9:00:00, datetime2=2012/10/01 9:00:00
dateTime2(UTC)=2012/10/01 0:00:00
db1=> select * from table1;
 id |         datetime1          |           datetime2
----+----------------------------+-------------------------------
  1 | 2012-09-27 11:23:28.487888 | 2012-09-27 11:23:28.487888+09
  2 | 2012-10-01 09:00:00        | 2012-10-01 09:00:00+09
(2 rows)
ここで、一旦id=2のレコードを削除します。
db1=> begin;
BEGIN
db1=> delete from table1 where id=2;
DELETE 1
db1=> commit;
COMMIT
id=1, datetime1=2012/09/27 11:23:28, datetime2=2012/09/27 11:23:28
dateTime2(UTC)=2012/09/27 2:23:28
id=2, datetime1=2012/10/01 9:00:00, datetime2=2012/10/01 10:00:00
dateTime2(UTC)=2012/10/01 1:00:00
db1=> select * from table1;
 id |         datetime1          |           datetime2
----+----------------------------+-------------------------------
  1 | 2012-09-27 11:23:28.487888 | 2012-09-27 10:23:28.487888+08
  2 | 2012-10-01 09:00:00        | 2012-10-01 09:00:00+08
(2 rows)
さらに、今度はクライアント側のタイムゾーンを台北にしてやってみると、
id=1, datetime1=2012/09/27 11:23:28, datetime2=2012/09/27 10:23:28
dateTime2(UTC)=2012/09/27 2:23:28
id=2, datetime1=2012/10/01 9:00:00, datetime2=2012/10/01 9:00:00
dateTime2(UTC)=2012/10/01 1:00:00
db1=> select * from table1;
 id |         datetime1          |           datetime2
----+----------------------------+-------------------------------
  1 | 2012-09-27 11:23:28.487888 | 2012-09-27 10:23:28.487888+08
  2 | 2012-10-01 09:00:00        | 2012-10-01 09:00:00+08
(2 rows)
サーバー側から見ると、クライアントのタイムゾーンがなんであっても、9:00としてinsertされたら、それはサーバー側のタイムゾーンでの時刻としてinsertされるようです。
念のため、今度はサーバー側のタイムゾーンを東京に戻して(クライアントのタイムゾーンは台北のまま)やってみると、
id=1, datetime1=2012/09/27 11:23:28, datetime2=2012/09/27 10:23:28
dateTime2(UTC)=2012/09/27 2:23:28
id=2, datetime1=2012/10/01 9:00:00, datetime2=2012/10/01 8:00:00
dateTime2(UTC)=2012/10/01 0:00:00
db1=> select * from table1;
 id |         datetime1          |           datetime2
----+----------------------------+-------------------------------
  1 | 2012-09-27 11:23:28.487888 | 2012-09-27 11:23:28.487888+09
  2 | 2012-10-01 09:00:00        | 2012-10-01 09:00:00+09
(2 rows)
datetiime2の列の値を表にしてみると
| タイムゾーンと結果 | UTC | |||
| サーバー | クライアント | |||
| 東京 | 9:00 | 東京 | 9:00 | 0:00 |
| 台北 | 9:00 | 東京 | 10:00 | 1:00 |
| 台北 | 9:00 | 台北 | 9:00 | 1:00 |
| 東京 | 9:00 | 台北 | 8:00 | 0:00 |
ここで、少し気になるのが、C#のコードの中のDataAdapterのInsertCommandのNpgsqlParameterの設定で、
da.InsertCommand.Parameters.Add(new Npgsql.NpgsqlParameter("datetime2", NpgsqlTypes.NpgsqlDbType.TimestampTZ, 0, "datetime2", ParameterDirection.Input, true , 0, 0, DataRowVersion.Current, DBNull.Value));
da.InsertCommand.Parameters.Add(new Npgsql.NpgsqlParameter("datetime2", NpgsqlTypes.NpgsqlDbType.Timestamp, 0, "datetime2", ParameterDirection.Input, true , 0, 0, DataRowVersion.Current, DBNull.Value));
試してみると、
| タイムゾーンと結果 | UTC | |||
| サーバー | クライアント | |||
| 東京 | 9:00 | 東京 | 9:00 | 0:00 |
| 台北 | 9:00 | 東京 | 10:00 | 1:00 |
| 台北 | 9:00 | 台北 | 9:00 | 1:00 |
| 東京 | 9:00 | 台北 | 8:00 | 0:00 |
NpgsqlDbType.TimestampTZとNpgsqlDbType.Timestampの使い分けがよくわからない感じですが、PostgreSQL側のテーブルの列がtimestamp with time zoneなら、NpgsqlDbType.TimestampTZを使って、timestamp without time zoneならNpgsqlDbType.Timestampを使っておけばいいのかな。
ただ、私のイメージしていた動きだと、C#のコードでDateTimeの時刻に9:00と入っていて、それをデータベースに書き込み、さらに読みなおしたときは9:00になっていて欲しい感じです。
| タイムゾーンと結果 | UTC | |||
| サーバー | クライアント | |||
| 東京 | 9:00 | 東京 | 9:00 | 0:00 |
| 台北 | 8:00 | 東京 | 9:00 | 0:00 |
| 台北 | 9:00 | 台北 | 9:00 | 1:00 |
| 東京 | 10:00 | 台北 | 9:00 | 1:00 |
追記:別のエントリで、もう少しツッコんで解決方法を考えてみました。
2010年12月6日月曜日
pgpool2による負荷分散
ラベル:
PostgreSQL
0
コメント
PostgreSQL 9.0.1でストリーミングレプリケーションしたサーバー群を、pgpool2を使って負荷分散させてみました。
イメージはこんな感じで。

pgpool2は3.0.1を使用します。
またこの時、pgpool2のモードは、マスタースレーブモードに設定します。
前回のAをマスターとして、BとCにレプリケーションした状態に、Dというpgpool2サーバーを入れます。
また、Dのpgpool2のポートは5432とし、クライアントはDのサーバーをPostgreSQLデータベースサーバーとしてアクセスするようにします。
pgpool2をマスタースレーブモードで動作させる場合、システムDBは不要ですが、pgpool2をソースからビルドするために、PostgreSQLのライブラリなどが必要になるので、PostgreSQL 9.0.1をソースからビルドしておきます。
pgpool2をインストールします。
pgpool2を設定します。
postgres:postgresのパスワードのMD5
という記述を追加します。
postgreslのパスワードのMD5で暗号化されたものは、
../bin/pg_md5 ユーザーpostgresのパスワード
で表示されます。
pgpool.confにpgpool.conf.sample-streamをコピーして編集します。
実際に動かして動作確認してみます。
クライアントから、Dのサーバーにポートを5432でアクセスして、更新クエリと参照クエリを適当に投げてみます。
すると、更新クエリは必ずサーバーAに送られ、参照クエリはA,B,Cのいずれかのサーバーに送られます。
イメージはこんな感じで。
pgpool2は3.0.1を使用します。
またこの時、pgpool2のモードは、マスタースレーブモードに設定します。
前回のAをマスターとして、BとCにレプリケーションした状態に、Dというpgpool2サーバーを入れます。
また、Dのpgpool2のポートは5432とし、クライアントはDのサーバーをPostgreSQLデータベースサーバーとしてアクセスするようにします。
pgpool2をマスタースレーブモードで動作させる場合、システムDBは不要ですが、pgpool2をソースからビルドするために、PostgreSQLのライブラリなどが必要になるので、PostgreSQL 9.0.1をソースからビルドしておきます。
pgpool2をインストールします。
$ sudo mkdir /usr/local/pgpool2
$ sudo chown postgres:postgres /usr/local/pgpool2
$ cd /usr/local/src
$ sudo wget http://pgfoundry.org/frs/download.php/2841/pgpool-II-3.0.1.tar.gz
$ sudo tar zxvf pgpool-II-3.0.1.tar.gz
$ chown -R postgres:postgres pgpool-II-3.0.1
$ sudo chown -R postgres:postgres pgpool-II-3.0.1
$ su - postgres
$ cd /usr/local/src/pgpool-II-3.0.1/
$ ./configure --prefix=/usr/local/pgpool2 -with-pgsql=/usr/local/pgsql
$ make
$ make install
pgpool2を設定します。
$ cd /usr/local/pgpool2/etc/
$ cp pcp.conf.sample pcp.conf
postgres:postgresのパスワードのMD5
という記述を追加します。
postgreslのパスワードのMD5で暗号化されたものは、
../bin/pg_md5 ユーザーpostgresのパスワード
で表示されます。
pgpool.confにpgpool.conf.sample-streamをコピーして編集します。
$ cp pgpool.conf.sample-stream pgpool.conf
listen_addresses = '*'
port = 5432
pid_file_name = '/var/run/pgpool.pid'
# 次の3行は確認用
log_statement = true             # 実行されるSQL文を出力
log_per_node_statement = true    # どのノードでSQL文が実行されたかを出力
log_connections = true           # ノードに接続されたことを出力

# システムDBは不要だけの一応設定
system_db_hostname = 'localhost'
system_db_port = 5433  # pgpool2を5432ポートで動かすので、PostgreSQLを動かすときは5433ポートにする
system_db_dbname = 'pgpool'
system_db_schema = 'pgpool_catalog'
system_db_user = 'pgpool'
system_db_password = ''

backend_hostname0 = 'マスター(A)のホスト'
backend_port0 = 5432
backend_weight0 = 1
backend_data_directory0 = '/usr/local/pgsql/data'
backend_hostname1 = 'スレーブ(B)のホスト'
backend_port1 = 5432
backend_weight1 = 1
backend_data_directory1 = '/usr/local/pgsql/data'
backend_hostname2 = 'スレーブ(C)のホスト'
backend_port2 = 5432
backend_weight2 = 1
backend_data_directory2 = '/usr/local/pgsql/data'
実際に動かして動作確認してみます。
$ sudo /usr/local/pgpool2/bin/pgpool -n
クライアントから、Dのサーバーにポートを5432でアクセスして、更新クエリと参照クエリを適当に投げてみます。
すると、更新クエリは必ずサーバーAに送られ、参照クエリはA,B,Cのいずれかのサーバーに送られます。
2010年11月10日水曜日
PostgreSQL 9.0でレプリケーション先の追加
ラベル:
PostgreSQL
0
コメント
前回、PostgreSQL 9.0のレプリケーション機能を試したが、今回は、レプリケーション先の追加を試してみました。
イメージはこんな感じで
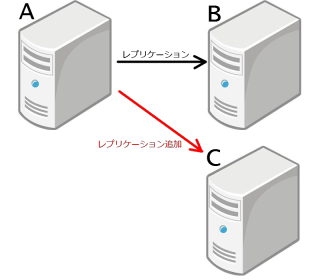
サーバーAからサーバーBにレプリケーションされている状態に、新たにサーバーCをレプリケーション先として追加します。
まず、サーバーCにubuntuを入れてPostgreSQL9.0をソースからビルドしておきます。
次に、サーバーBとサーバーCのPostgreSQLを停止します。
サーバーBで
サーバーBの/usr/local/pgsql/dataをサーバーCにコピーします。
サーバーBで
最後に、サーバーBとサーバーCのPostgreSQLを起動します。
サーバーBで
これで、サーバーCがレプリケーション先として追加できました。
動作を確認してみます。
レプリケーション元のデータを更新します。
サーバーAで
あと、レプリケーション先のサーバーBとサーバーCのPostgreSQLが停止している間に、サーバーAのデータが更新された場合も確認してみました。
まず、レプリケーション先のPostgreSQLを停止します。
サーバーBで
次に、レプリケーション元のサーバーAのデータを更新します。
レプリケーション先のPostgreSQLを起動します。
サーバーBで
レプリケーション元のサーバーAの更新内容が反映されているか確認します。
サーバーBとサーバーCで
イメージはこんな感じで
サーバーAからサーバーBにレプリケーションされている状態に、新たにサーバーCをレプリケーション先として追加します。
まず、サーバーCにubuntuを入れてPostgreSQL9.0をソースからビルドしておきます。
次に、サーバーBとサーバーCのPostgreSQLを停止します。
サーバーBで
$ sudo /etc/init.d/postgresql stop
$ sudo /etc/init.d/postgresql stop
サーバーBの/usr/local/pgsql/dataをサーバーCにコピーします。
サーバーBで
$ su - postgres
$ cd /usr/local/pgsql/
$ tar zcvf data.tar.gz data
$ scp data.tar.gz 192.168.168.238:/usr/local/pgsql/
$ exit
$ su - postgres
$ cd /usr/local/pgsql/
$ tar zxvf data.tar.gz
$ exit
最後に、サーバーBとサーバーCのPostgreSQLを起動します。
サーバーBで
$ sudo /etc/init.d/postgresql start
$ sudo /etc/init.d/postgresql start
これで、サーバーCがレプリケーション先として追加できました。
動作を確認してみます。
レプリケーション元のデータを更新します。
サーバーAで
$ su - postgres
$ psql testdb
testdb=# select * from table1;
 id |        create_date
----+----------------------------
  1 | 2010-11-08 11:19:10.162554
(1 row)

testdb=# insert into table1(id) values (2);
INSERT 0 1
testdb=# select * from table1;
 id |        create_date
----+----------------------------
  1 | 2010-11-08 11:19:10.162554
  2 | 2010-11-10 14:54:15.611948
(2 rows)
$ su - postgres
$ psql testdb
testdb=# select * from table1;
 id |        create_date
----+----------------------------
  1 | 2010-11-08 11:19:10.162554
  2 | 2010-11-10 14:54:15.611948
(2 rows)
あと、レプリケーション先のサーバーBとサーバーCのPostgreSQLが停止している間に、サーバーAのデータが更新された場合も確認してみました。
まず、レプリケーション先のPostgreSQLを停止します。
サーバーBで
$ sudo /etc/init.d/postgresql stop
$ sudo /etc/init.d/postgresql stop
次に、レプリケーション元のサーバーAのデータを更新します。
$ su - postgres
$ psql testdb
testdb=# select * from table1;
 id |        create_date
----+----------------------------
  1 | 2010-11-08 11:19:10.162554
  2 | 2010-11-10 14:54:15.611948
(2 rows)

testdb=# insert into table1(id) values (3);
INSERT 0 1
testdb=# select * from table1;
 id |        create_date
----+----------------------------
  1 | 2010-11-08 11:19:10.162554
  2 | 2010-11-10 14:54:15.611948
  3 | 2010-11-10 14:59:57.012077
(3 rows)
レプリケーション先のPostgreSQLを起動します。
サーバーBで
$ sudo /etc/init.d/postgresql start
$ sudo /etc/init.d/postgresql start
レプリケーション元のサーバーAの更新内容が反映されているか確認します。
サーバーBとサーバーCで
$ su - postgres
$ psql testdb
testdb=# select * from table1;
 id |        create_date
----+----------------------------
  1 | 2010-11-08 11:19:10.162554
  2 | 2010-11-10 14:54:15.611948
  3 | 2010-11-10 14:59:57.012077
(3 rows)
2010年11月5日金曜日
PostgreSQL 9.0でレプリケーション
ラベル:
PostgreSQL
0
コメント
PostgreSQL 9.0でレプリケーション機能が追加されたので、試してみました。
環境は、OSにubuntu 10.04 LTS Serverを使ってみました。
ESXi4.1に仮想PCを2台用意して、それぞれにubuntuを入れて、PostgreSQLをソースからビルドしておきます。
■レプリケーション元のPostgreSQLの設定を変更
まず、PostgreSQLを停止します。
■レプリケーション先のPostgreSQLの設定を変更
まず、PostgreSQLを停止します。
■レプリケーション元のPostgreSQLを起動して、データベースを作成
■レプリケーション元のデータをレプリケーション先にコピー
レプリケーション元のデータをレプリケーション先にコピーします。
■確認
レプリケーション元でtestdbにテーブルを作成してみます。
割と簡単に設定できました。
そのうち、レプリケーション先の追加や、レプリケーション先の昇格などやってみたいと思います。
環境は、OSにubuntu 10.04 LTS Serverを使ってみました。
ESXi4.1に仮想PCを2台用意して、それぞれにubuntuを入れて、PostgreSQLをソースからビルドしておきます。
■レプリケーション元のPostgreSQLの設定を変更
まず、PostgreSQLを停止します。
$ sudo /etc/init.d/postgresql stop
$ su - postgres
$ cd /usr/local/pgsql/data
listen_addresses = '*'
port = 5432
wal_level = hot_standby
archive_mode = on
archive_command = 'cp %p /usr/local/pgsql/data/pg_archive/%f'
max_wal_senders = 3
host replication all 192.168.168.0/24 trust
$ mkdir pg_archive
$ exit
■レプリケーション先のPostgreSQLの設定を変更
まず、PostgreSQLを停止します。
$ sudo /etc/init.d/postgresql stop
$ su - postgres
$ cd /usr/local/pgsql/data
listen_addresses = '*'
port = 5432
wal_level = hot_standby
archive_mode = on
archive_command = 'cp %p /usr/local/pgsql/data/pg_archive/%f'
max_wal_senders = 3
hot_standby = on
host replication all 192.168.168.0/24 trust
standby_mode = 'on'
primary_conninfo = 'host=レプリケーション元のホスト port=5432 user=postgres'
restore_command = 'cp /usr/local/pgsql/data/pg_archive/%f %p'
trigger_file = '/usr/localpgsql/data/trigger'
$ mkdir pg_archive
$ exit
■レプリケーション元のPostgreSQLを起動して、データベースを作成
$ sudo /etc/init.d/postgresql start
$ su - postgres
$ createdb testdb
$ psql -l
                              List of databases
   Name    |  Owner   | Encoding | Collation | Ctype |   Access privileges
-----------+----------+----------+-----------+-------+-----------------------
 postgres  | postgres | UTF8     | C         | C     |
 template0 | postgres | UTF8     | C         | C     | =c/postgres          +
           |          |          |           |       | postgres=CTc/postgres
 template1 | postgres | UTF8     | C         | C     | =c/postgres          +
           |          |          |           |       | postgres=CTc/postgres
 testdb    | postgres | UTF8     | C         | C     |
(4 rows)
■レプリケーション元のデータをレプリケーション先にコピー
レプリケーション元のデータをレプリケーション先にコピーします。
$ cd /usr/local/pgsql
$ tar zcvf data.tar.gz data
$ scp data.tar.gz レプリケーション先のホスト:/usr/local/pgsql/
$ su - postgres
$ cd /usr/local/pgsql
$ mkdir ~/conf_backup
$ cp -a data/*.conf ~/conf_backup/
$ tar zxvf data.tar.gz
$ cp -a ~/conf_backup/*.conf data/
$ rm -f data/postmaster.pid
$ exit
$ sudo /etc/init.d/postgresql start
■確認
レプリケーション元でtestdbにテーブルを作成してみます。
$ su - postgres
$ psql testdb
testdb=# create table table1 (id integer, create_date timestamp default current_timestamp);
testdb=# \d
         List of relations
 Schema |  Name  | Type  |  Owner
--------+--------+-------+----------
 public | table1 | table | postgres
(1 row)
testdb=# \d table1
                   Table "public.table1"
   Column    |            Type             |   Modifiers
-------------+-----------------------------+---------------
 id          | integer                     |
 create_date | timestamp without time zone | default now()
$ su - postgres
$ psql testdb
testdb=# \dt
         List of relations
 Schema |  Name  | Type  |  Owner
--------+--------+-------+----------
 public | table1 | table | postgres
(1 row)
testdb=# \d table1
                   Table "public.table1"
   Column    |            Type             |   Modifiers
-------------+-----------------------------+---------------
 id          | integer                     |
 create_date | timestamp without time zone | default now()
$ createdb testdb2
$ psql -l
                              List of databases
   Name    |  Owner   | Encoding | Collation | Ctype |   Access privileges
-----------+----------+----------+-----------+-------+-----------------------
 postgres  | postgres | UTF8     | C         | C     |
 template0 | postgres | UTF8     | C         | C     | =c/postgres          +
           |          |          |           |       | postgres=CTc/postgres
 template1 | postgres | UTF8     | C         | C     | =c/postgres          +
           |          |          |           |       | postgres=CTc/postgres
 testdb    | postgres | UTF8     | C         | C     |
 testdb2   | postgres | UTF8     | C         | C     |
(5 rows)
$ psql -l
                              List of databases
   Name    |  Owner   | Encoding | Collation | Ctype |   Access privileges
-----------+----------+----------+-----------+-------+-----------------------
 postgres  | postgres | UTF8     | C         | C     |
 template0 | postgres | UTF8     | C         | C     | =c/postgres          +
           |          |          |           |       | postgres=CTc/postgres
 template1 | postgres | UTF8     | C         | C     | =c/postgres          +
           |          |          |           |       | postgres=CTc/postgres
 testdb    | postgres | UTF8     | C         | C     |
 testdb2   | postgres | UTF8     | C         | C     |
(5 rows)
割と簡単に設定できました。
そのうち、レプリケーション先の追加や、レプリケーション先の昇格などやってみたいと思います。
2010年2月25日木曜日
PostgreSQLをソースからビルド
ラベル:
PostgreSQL
,
ubuntu
0
コメント
ubuntu8.04 LTS Serverで、PostgreSQLをソースからビルドする手順です。
コンパイラなどのビルドに必要なパッケージがインストールされていないときは、build-essentialをインストールします。
ビルドに必要なパッケージをインストールします。
PostgreSQLの管理者のpostgresユーザーを作成します。
PostgreSQLのディレクトリを作成します。
ソースをダウンロードしてきます。今回は現時点で最新の8.4.2を使います。
ユーザーをpostgresに切り替えてビルドします。
postgresユーザーの環境変数の設定を行います。
~/.profileの末尾に
PostgreSQLの初期化を行います。
postgresユーザーから元のユーザーに戻ります。
/etc/ld.so.confにライブラリを追加します。
OS起動時にPostgreSQLが自動起動するように設定します。
PostgreSQLを起動します。
コンパイラなどのビルドに必要なパッケージがインストールされていないときは、build-essentialをインストールします。
$ sudo apt-get install build-essential
ビルドに必要なパッケージをインストールします。
sudo apt-get install libreadline5-dev zlib1g-dev
PostgreSQLの管理者のpostgresユーザーを作成します。
$ sudo adduser postgres
Adding user `postgres' ...
Adding new group `postgres' (1001) ...
Adding new user `postgres' (1001) with group `postgres' ...
Creating home directory `/home/postgres' ...
Copying files from `/etc/skel' ...
Enter new UNIX password:
Retype new UNIX password:
passwd: password updated successfully
Changing the user information for postgres
Enter the new value, or press ENTER for the default
        Full Name []:
        Room Number []:
        Work Phone []:
        Home Phone []:
        Other []:
Is the information correct? [y/N] y
PostgreSQLのディレクトリを作成します。
$ sudo mkdir /usr/local/pgsql
sudo chown postgres:postgres /usr/local/pgsql
ソースをダウンロードしてきます。今回は現時点で最新の8.4.2を使います。
$ cd /usr/local/src
sudo wget ftp://ftp2.jp.postgresql.org/pub/postgresql/source/v8.4.2/postgresql-8.4.2.tar.gz
sudo tar zxvf postgresql-8.4.2.tar.gz
sudo chown -R postgres:postgres postgresql-8.4.2
ユーザーをpostgresに切り替えてビルドします。
$ su - postgres
Password:
$ cd /usr/local/src/postgresql-8.4.2/
$ ./configure
$ make
$ make install
postgresユーザーの環境変数の設定を行います。
~/.profileの末尾に
# User specific environment and startup programs
PGHOME=/usr/local/pgsql
PGDATA=$PGHOME/data
PGLIB=$PGHOME/lib
PATH=$PATH:$HOME/bin:$PGHOME/bin
export PGHOME PGDATA PGLIB PATH
$ source ~/.profile
PostgreSQLの初期化を行います。
$ initdb --no-locale
postgresユーザーから元のユーザーに戻ります。
$ exit
/etc/ld.so.confにライブラリを追加します。
sudo vi /etc/ld.so.conf
sudo ldconfig -v
OS起動時にPostgreSQLが自動起動するように設定します。
$ sudo cp /usr/local/src/postgresql-8.4.2/contrib/start-scripts/linux /etc/init.d/postgresql
$ sudo chmod 755 /etc/init.d/postgresql
$ sudo update-rc.d postgresql start 90 2 3 4 5 . stop 10 0 1 6 .
PostgreSQLを起動します。
$ sudo /etc/init.d/postgresql start
2010年2月22日月曜日
PostgreSQLをインストール後に、initdbする。
ラベル:
PostgreSQL
,
ubuntu
0
コメント
ubuntuでパッケージからPostgreSQLをインストールした後で、EUC_JPなデータベースを作ろうとするとエラーになるときの対応法です。
ubuntu8.04 LTS ServerにPostgreSQLを次の手順でインストールします。
対応方法として、これで正しいのか確証はないですけど、次の手順で対応しました。
改めで、EUC_JPのデータベースを作成してみます。
ubuntu8.04 LTS ServerにPostgreSQLを次の手順でインストールします。
$ sudo apt-get install postgresql-8.3
$ su - postgres
$ createdb データベース名 -O オーナー -E EUC_JP
createdb: database creation failed: ERROR:  encoding EUC_JP does not match server's locale ja_JP.UTF-8
DETAIL:  The server's LC_CTYPE setting requires encoding UTF8.
対応方法として、これで正しいのか確証はないですけど、次の手順で対応しました。
$ sudo localedef -i ja_JP -f euc-JP ja_JP.EUC-JP
$ cd /var/lib/postgresql/8.3
$ sudo mv main main_org
$ sudo mkdir main
$ sudo chown -R postgres:postgres main
$ su - postgres
$ /usr/lib/postgresql/8.3/bin/initdb -D /var/lib/postgresql/8.3/main --encoding=UTF8 --no-locale
$ exit
$ sudo mv main main_new
$ sudo mv main_org main
$ sudo /etc/init.d/postgresql-8.3 stop
$ sudo mv main main_org
$ sudo mv main_new main
$ sudo su - root
# cd /var/lib/postgresql/8.3/main
# ln -s /etc/postgresql-common/root.crt root.crt
# ln -s /etc/ssl/certs/ssl-cert-snakeoil.pem server.crt
# ln -s /etc/ssl/private/ssl-cert-snakeoil.key server.key
# exit
$ sudo /etc/init.d/postgresql-8.3 start
改めで、EUC_JPのデータベースを作成してみます。
$ su - postgres
$ createdb xxxx -E EUC_JP
$ psql -l
        List of databases
   Name    |  Owner   | Encoding
-----------+----------+----------
 postgres  | postgres | UTF8
 template0 | postgres | UTF8
 template1 | postgres | UTF8
 xxxx      | postgres | EUC_JP
(4 rows)
登録:
投稿
(
Atom
)