2011年1月10日月曜日

WPFのDataGridにDataTableを表示

0 コメント
WPFのDataGridコントロールにDataTableの内容を表示してみました。

テーブルの構成は下図のような感じ。

この中の商品マスタをDataGridで表示します。

まず、VisualStudio 2010で、[新規作成]→[プロジェクト]→[WPFアプリケーション]を選択し、WPFDataGridSampleというプロジェクトを作成します。

MainWindowsというフォームが作成されるので、ここにDataGridコントロールを貼り付けて、XAMLのソースを次のように編集して、カラムを追加します。
<Window x:Class="WPFDataGridSample.MainWindow"
        xmlns="http://schemas.microsoft.com/winfx/2006/xaml/presentation"
        xmlns:x="http://schemas.microsoft.com/winfx/2006/xaml"
        Title="MainWindow" Height="350" Width="525">
    <Window.Resources>
        <Style x:Key="NumericStyle" TargetType="TextBlock">
            <Setter Property="TextAlignment" Value="Right" />
        </Style>
    </Window.Resources>
    <Grid>
        <DataGrid Name="dataGrid1" AutoGenerateColumns="False"
                  HorizontalAlignment="Stretch" VerticalAlignment="Stretch" ItemsSource="{Binding}">
            <DataGrid.Columns>
                <DataGridTextColumn
                    x:Name="col_item_id"
                    Header="ID"
                    Binding="{Binding item_id}"
                    ElementStyle="{StaticResource NumericStyle}"
                    IsReadOnly="True"
                />
                <DataGridTextColumn
                    x:Name="col_item_name"
                    Header="商品名"
                    Binding="{Binding item_name}"
                />
                <DataGridComboBoxColumn
                    x:Name="col_category_id"
                    Header="カテゴリ"
                    SelectedValueBinding="{Binding category_id}"
                    SelectedValuePath="category_id"
                    DisplayMemberPath="category_name"
                />
                <DataGridCheckBoxColumn
                    x:Name="col_status"
                    Header="ステータス"
                    Binding="{Binding status}"
                />
                <DataGridTextColumn
                    x:Name="col_create_date"
                    Header="作成日時"
                    Binding="{Binding create_date, StringFormat=yyyy/MM/dd HH:mm:ss}"
                    IsReadOnly="True"
                />
                <DataGridTextColumn
                    x:Name="col_update_date"
                    Header="更新日時"
                    Binding="{Binding update_date, StringFormat=yyyy/MM/dd HH:mm:ss}"
                    IsReadOnly="True"
                />
            </DataGrid.Columns>
        </DataGrid>
    </Grid>
</Window>
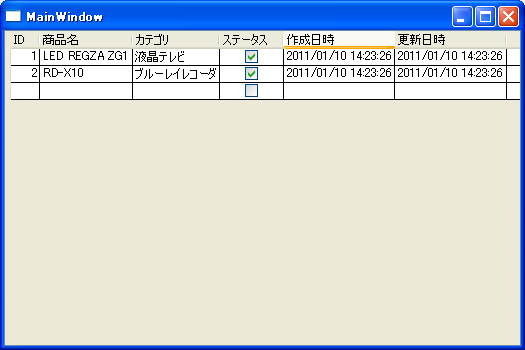
そうすると、次のようなフォームができます。

ポイントは、DataGrid.Columnsの中で各カラムを設定するときに、
  • Header="xxxx"で、カラムのタイトルを設定します。例えば Header="商品名"
  • Binding="{Binding xxxx}"で、DataTableの列名を指定します。例えば Binding="{Binding item_name}"
とします。

次に、MainWindows.xaml.csに次のコードを記述します。
using System;
using System.Collections.Generic;
using System.Linq;
using System.Text;
using System.Windows;
using System.Windows.Controls;
using System.Windows.Data;
using System.Windows.Documents;
using System.Windows.Input;
using System.Windows.Media;
using System.Windows.Media.Imaging;
using System.Windows.Navigation;
using System.Windows.Shapes;
using System.Data;

namespace WPFDataGridSample
{
    /// <summary>
    /// MainWindow.xaml の相互作用ロジック
    /// </summary>
    public partial class MainWindow : Window
    {
        //-------------------------------------------------------------------- メンバ変数
        private DataTable m_table_mst_category;    // カテゴリマスタテーブル
        private DataTable m_table_mst_item;        // 商品マスタテーブル

        //-------------------------------------------------------------------- コンストラクタ
        public MainWindow()
        {
            InitializeComponent();

            // テーブルの初期化
            try
            {
                InitTables();
            }
            catch (Exception ex)
            {
                MessageBox.Show(ex.Message, Title, MessageBoxButton.OK, MessageBoxImage.Error);
                return;
            }

            // グリッドにバインド
            dataGrid1.DataContext = m_table_mst_item;
            col_category_id.ItemsSource = m_table_mst_category.DefaultView;    // カテゴリ列
        }

        //-------------------------------------------------------------------- メンバ関数
        /// <summary>
        /// テーブルの初期化
        /// </summary>
        private void InitTables()
        {
            // カテゴリマスタテーブルの生成
            m_table_mst_category = new DataTable("mst_category");
            m_table_mst_category.Columns.Add(new DataColumn("category_id"  , typeof(int)     ));    // カテゴリID
            m_table_mst_category.Columns.Add(new DataColumn("category_name", typeof(string)  ));    // カテゴリ名
            m_table_mst_category.Columns.Add(new DataColumn("create_date"  , typeof(DateTime)));    // 作成日時
            m_table_mst_category.Columns.Add(new DataColumn("update_date"  , typeof(DateTime)));    // 更新日時
            m_table_mst_category.PrimaryKey = new DataColumn[] { m_table_mst_category.Columns["category_id"] };    // プライマリキーの設定
            m_table_mst_category.Columns["category_name"].Unique = true;                                           // ユニークキーの設定
            m_table_mst_category.Columns["category_id"].AutoIncrement     = true;                                  // 自動採番の設定
            m_table_mst_category.Columns["category_id"].AutoIncrementSeed = 1;                                     // 自動採番は1から始まり
            m_table_mst_category.Columns["category_id"].AutoIncrementStep = 1;                                     // 自動採番は1ずつ増加
            m_table_mst_category.TableNewRow += new DataTableNewRowEventHandler(m_table_mst_category_TableNewRow); // TableNewRowイベントの追加
            // サンプルデータ追加
            foreach (var category_name in new string[] { "液晶テレビ", "ブルーレイレコーダ" })
            {
                DataRow newRow = m_table_mst_category.NewRow();
                newRow["category_name"] = category_name;
                m_table_mst_category.Rows.Add(newRow);
            }

            // 商品マスタテーブルの生成
            m_table_mst_item = new DataTable("mst_item");
            m_table_mst_item.Columns.Add(new DataColumn("item_id"    , typeof(int)     ));          // 商品ID
            m_table_mst_item.Columns.Add(new DataColumn("item_name"  , typeof(string)  ));          // 商品名
            m_table_mst_item.Columns.Add(new DataColumn("category_id", typeof(int)     ));          // カテゴリID
            m_table_mst_item.Columns.Add(new DataColumn("status"     , typeof(bool)    ));          // ステータス
            m_table_mst_item.Columns.Add(new DataColumn("create_date", typeof(DateTime)));          // 作成日時
            m_table_mst_item.Columns.Add(new DataColumn("update_date", typeof(DateTime)));          // 更新日時
            m_table_mst_item.PrimaryKey = new DataColumn[] { m_table_mst_item.Columns["item_id"] };                // プライマリキーの設定
            m_table_mst_item.Columns["item_name"].Unique = true;                                                   // ユニークキーの設定
            m_table_mst_item.Columns["item_id"].AutoIncrement     = true;                                          // 自動採番の設定
            m_table_mst_item.Columns["item_id"].AutoIncrementSeed = 1;                                             // 自動採番は1から始まり
            m_table_mst_item.Columns["item_id"].AutoIncrementStep = 1;                                             // 自動採番は1ずつ増加
            m_table_mst_item.TableNewRow += new DataTableNewRowEventHandler(m_table_mst_item_TableNewRow);         // TableNewRowイベントの追加
            // サンプルデータ追加
            DataRow newRowItem;
            newRowItem = m_table_mst_item.NewRow();
            newRowItem["item_name"] = "LED REGZA ZG1";
            newRowItem["category_id"] = m_table_mst_category.Select("category_name='液晶テレビ'")[0]["category_id"];
            m_table_mst_item.Rows.Add(newRowItem);
            newRowItem = m_table_mst_item.NewRow();
            newRowItem["item_name"] = "RD-X10";
            newRowItem["category_id"] = m_table_mst_category.Select("category_name='ブルーレイレコーダ'")[0]["category_id"];
            m_table_mst_item.Rows.Add(newRowItem);
        }

        //-------------------------------------------------------------------- イベント関数
        // カテゴリマスタのTableNewRowイベント
        private void m_table_mst_category_TableNewRow(object sender, DataTableNewRowEventArgs e)
        {
            e.Row["create_date"] = DateTime.Now;
            e.Row["update_date"] = DateTime.Now;
        }

        // 商品マスタのTableNewRowイベント
        private void m_table_mst_item_TableNewRow(object sender, DataTableNewRowEventArgs e)
        {
            e.Row["status"     ] = true;
            e.Row["create_date"] = DateTime.Now;
            e.Row["update_date"] = DateTime.Now;
        }

    }
}
メンバ変数に、m_table_mst_categoryとm_table_mst_itemというDataTableを用意して、InitTables関数で各テーブルを生成しサンプルデータを作成しています。

ポイントになるのは、コンストラクタの
            // グリッドにバインド
            dataGrid1.DataContext = m_table_mst_item;
            col_category_id.ItemsSource = m_table_mst_category.DefaultView;    // カテゴリ列
の部分で、
            dataGrid1.DataContext = m_table_mst_item;
で、DataGridに商品マスタのDataTableをバインドしています。
また、DataGridの列の中で、カテゴリ列はコンボボックスで選択できるようにするため、
            col_category_id.ItemsSource = m_table_mst_category.DefaultView;
で、col_category_idにバインドしています。さらにMainWindow.xamlの中でカテゴリ列は
                <DataGridComboBoxColumn
                    x:Name="col_category_id"
                    Header="カテゴリ"
                    SelectedValueBinding="{Binding category_id}"
                    SelectedValuePath="category_id"
                    DisplayMemberPath="category_name"
                />
としているため、カテゴリマスタテーブル(m_table_mst_category)のcategory_idが選択値、category_nameが表示値となります。
※商品マスタのcategory_idとのバインディングは、Binding="{Binding category_id}"ではなく、SelectedValueBinding="{Binding category_id}"で行います。

ここで注意する点として、col_category_id.ItemsSourceを、
            col_category_id.ItemsSource = m_table_mst_category.Rows;
とすると、カテゴリ列が空白になって正しく表示されません。ただ入力するときのコンボボックスのドロップダウンする行数はカテゴリマスタの件数と一致しているので、カテゴリ列とカテゴリマスタのDataTableとのバインドはうまくいっていると思いますが、表示がうまくいかないようです(DataGridのバグなのか制約なのかよくわかりません)。

実行すると、次のような画面が表示されます。


個人的な感想として、BindingSourceやBindingNavigationなどが使えないため、Windowsフォームのように簡単には作れない感じです。
あと、データとDataGridのバインディングの方法がわかりにくい(今もまだしっかりわかっていない気がします)です。

2010年12月6日月曜日

pgpool2による負荷分散

0 コメント
PostgreSQL 9.0.1でストリーミングレプリケーションしたサーバー群を、pgpool2を使って負荷分散させてみました。
イメージはこんな感じで。


pgpool2は3.0.1を使用します。
またこの時、pgpool2のモードは、マスタースレーブモードに設定します。

前回のAをマスターとして、BとCにレプリケーションした状態に、Dというpgpool2サーバーを入れます。
また、Dのpgpool2のポートは5432とし、クライアントはDのサーバーをPostgreSQLデータベースサーバーとしてアクセスするようにします。

pgpool2をマスタースレーブモードで動作させる場合、システムDBは不要ですが、pgpool2をソースからビルドするために、PostgreSQLのライブラリなどが必要になるので、PostgreSQL 9.0.1をソースからビルドしておきます。

pgpool2をインストールします。
$ sudo mkdir /usr/local/pgpool2
$ sudo chown postgres:postgres /usr/local/pgpool2
$ cd /usr/local/src
$ sudo wget http://pgfoundry.org/frs/download.php/2841/pgpool-II-3.0.1.tar.gz
$ sudo tar zxvf pgpool-II-3.0.1.tar.gz
$ chown -R postgres:postgres pgpool-II-3.0.1
$ sudo chown -R postgres:postgres pgpool-II-3.0.1
$ su - postgres
$ cd /usr/local/src/pgpool-II-3.0.1/
$ ./configure --prefix=/usr/local/pgpool2 -with-pgsql=/usr/local/pgsql
$ make
$ make install

pgpool2を設定します。
$ cd /usr/local/pgpool2/etc/
まずpcp.confにpcp.conf.sampleをコピーして編集します。
$ cp pcp.conf.sample pcp.conf
pcp.confに、
postgres:postgresのパスワードのMD5
という記述を追加します。
postgreslのパスワードのMD5で暗号化されたものは、
../bin/pg_md5 ユーザーpostgresのパスワード
で表示されます。

pgpool.confにpgpool.conf.sample-streamをコピーして編集します。
$ cp pgpool.conf.sample-stream pgpool.conf
内容の次の箇所を変更します。
listen_addresses = '*'
port = 5432
pid_file_name = '/var/run/pgpool.pid'
# 次の3行は確認用
log_statement = true             # 実行されるSQL文を出力
log_per_node_statement = true    # どのノードでSQL文が実行されたかを出力
log_connections = true           # ノードに接続されたことを出力

# システムDBは不要だけの一応設定
system_db_hostname = 'localhost'
system_db_port = 5433  # pgpool2を5432ポートで動かすので、PostgreSQLを動かすときは5433ポートにする
system_db_dbname = 'pgpool'
system_db_schema = 'pgpool_catalog'
system_db_user = 'pgpool'
system_db_password = ''

backend_hostname0 = 'マスター(A)のホスト'
backend_port0 = 5432
backend_weight0 = 1
backend_data_directory0 = '/usr/local/pgsql/data'
backend_hostname1 = 'スレーブ(B)のホスト'
backend_port1 = 5432
backend_weight1 = 1
backend_data_directory1 = '/usr/local/pgsql/data'
backend_hostname2 = 'スレーブ(C)のホスト'
backend_port2 = 5432
backend_weight2 = 1
backend_data_directory2 = '/usr/local/pgsql/data'

実際に動かして動作確認してみます。
$ sudo /usr/local/pgpool2/bin/pgpool -n

クライアントから、Dのサーバーにポートを5432でアクセスして、更新クエリと参照クエリを適当に投げてみます。
すると、更新クエリは必ずサーバーAに送られ、参照クエリはA,B,Cのいずれかのサーバーに送られます。

2010年11月10日水曜日

PostgreSQL 9.0でレプリケーション先の追加

0 コメント
前回、PostgreSQL 9.0のレプリケーション機能を試したが、今回は、レプリケーション先の追加を試してみました。
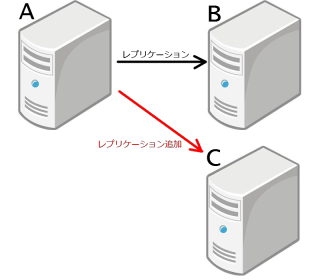
イメージはこんな感じで

サーバーAからサーバーBにレプリケーションされている状態に、新たにサーバーCをレプリケーション先として追加します。

まず、サーバーCにubuntuを入れてPostgreSQL9.0をソースからビルドしておきます。

次に、サーバーBとサーバーCのPostgreSQLを停止します。
サーバーBで
$ sudo /etc/init.d/postgresql stop
サーバーCで
$ sudo /etc/init.d/postgresql stop

サーバーBの/usr/local/pgsql/dataをサーバーCにコピーします。
サーバーBで
$ su - postgres
$ cd /usr/local/pgsql/
$ tar zcvf data.tar.gz data
$ scp data.tar.gz 192.168.168.238:/usr/local/pgsql/
$ exit
サーバーCで
$ su - postgres
$ cd /usr/local/pgsql/
$ tar zxvf data.tar.gz
$ exit

最後に、サーバーBとサーバーCのPostgreSQLを起動します。
サーバーBで
$ sudo /etc/init.d/postgresql start
サーバーCで
$ sudo /etc/init.d/postgresql start

これで、サーバーCがレプリケーション先として追加できました。
動作を確認してみます。
レプリケーション元のデータを更新します。
サーバーAで
$ su - postgres
$ psql testdb
testdb=# select * from table1;
 id |        create_date
----+----------------------------
  1 | 2010-11-08 11:19:10.162554
(1 row)

testdb=# insert into table1(id) values (2);
INSERT 0 1
testdb=# select * from table1;
 id |        create_date
----+----------------------------
  1 | 2010-11-08 11:19:10.162554
  2 | 2010-11-10 14:54:15.611948
(2 rows)
サーバーBとサーバーCで
$ su - postgres
$ psql testdb
testdb=# select * from table1;
 id |        create_date
----+----------------------------
  1 | 2010-11-08 11:19:10.162554
  2 | 2010-11-10 14:54:15.611948
(2 rows)
となり、更新内容が反映されていることが確認できました。


あと、レプリケーション先のサーバーBとサーバーCのPostgreSQLが停止している間に、サーバーAのデータが更新された場合も確認してみました。

まず、レプリケーション先のPostgreSQLを停止します。
サーバーBで
$ sudo /etc/init.d/postgresql stop
サーバーCで
$ sudo /etc/init.d/postgresql stop

次に、レプリケーション元のサーバーAのデータを更新します。
$ su - postgres
$ psql testdb
testdb=# select * from table1;
 id |        create_date
----+----------------------------
  1 | 2010-11-08 11:19:10.162554
  2 | 2010-11-10 14:54:15.611948
(2 rows)

testdb=# insert into table1(id) values (3);
INSERT 0 1
testdb=# select * from table1;
 id |        create_date
----+----------------------------
  1 | 2010-11-08 11:19:10.162554
  2 | 2010-11-10 14:54:15.611948
  3 | 2010-11-10 14:59:57.012077
(3 rows)

レプリケーション先のPostgreSQLを起動します。
サーバーBで
$ sudo /etc/init.d/postgresql start
サーバーCで
$ sudo /etc/init.d/postgresql start

レプリケーション元のサーバーAの更新内容が反映されているか確認します。
サーバーBとサーバーCで
$ su - postgres
$ psql testdb
testdb=# select * from table1;
 id |        create_date
----+----------------------------
  1 | 2010-11-08 11:19:10.162554
  2 | 2010-11-10 14:54:15.611948
  3 | 2010-11-10 14:59:57.012077
(3 rows)
となり、更新内容が反映されていることが確認できました。

2010年11月5日金曜日

PostgreSQL 9.0でレプリケーション

0 コメント
PostgreSQL 9.0でレプリケーション機能が追加されたので、試してみました。

環境は、OSにubuntu 10.04 LTS Serverを使ってみました。
ESXi4.1に仮想PCを2台用意して、それぞれにubuntuを入れて、PostgreSQLをソースからビルドしておきます。

■レプリケーション元のPostgreSQLの設定を変更
まず、PostgreSQLを停止します。
$ sudo /etc/init.d/postgresql stop
PostgreSQLの管理ユーザーになって、設定ファイルを編集します。
$ su - postgres
$ cd /usr/local/pgsql/data
postgresql.confに次の設定を追加します。
listen_addresses = '*'
port = 5432
wal_level = hot_standby
archive_mode = on
archive_command = 'cp %p /usr/local/pgsql/data/pg_archive/%f'
max_wal_senders = 3
pg_hba.confに次の設定を追加します。
host    replication     all             192.168.168.0/24        trust
アーカイブディレクトリを作成します。
$ mkdir pg_archive
PostgreSQLの管理ユーザーを抜けます。
$ exit

■レプリケーション先のPostgreSQLの設定を変更
まず、PostgreSQLを停止します。
$ sudo /etc/init.d/postgresql stop
PostgreSQLの管理ユーザーになって、設定ファイルを編集します。
$ su - postgres
$ cd /usr/local/pgsql/data
postgresql.confに次の設定を追加します。
listen_addresses = '*'
port = 5432
wal_level = hot_standby
archive_mode = on
archive_command = 'cp %p /usr/local/pgsql/data/pg_archive/%f'
max_wal_senders = 3
hot_standby = on
pg_hba.confに次の設定を追加します。
host    replication     all             192.168.168.0/24        trust
recovery.confというファイルを作成して、次の設定を記述します。
standby_mode = 'on'
primary_conninfo = 'host=レプリケーション元のホスト port=5432 user=postgres'
restore_command = 'cp /usr/local/pgsql/data/pg_archive/%f %p'
trigger_file = '/usr/localpgsql/data/trigger'
アーカイブディレクトリを作成します。
$ mkdir pg_archive
PostgreSQLの管理ユーザーを抜けます。
$ exit

■レプリケーション元のPostgreSQLを起動して、データベースを作成
$ sudo /etc/init.d/postgresql start
$ su - postgres
$ createdb testdb
$ psql -l
                              List of databases
   Name    |  Owner   | Encoding | Collation | Ctype |   Access privileges
-----------+----------+----------+-----------+-------+-----------------------
 postgres  | postgres | UTF8     | C         | C     |
 template0 | postgres | UTF8     | C         | C     | =c/postgres          +
           |          |          |           |       | postgres=CTc/postgres
 template1 | postgres | UTF8     | C         | C     | =c/postgres          +
           |          |          |           |       | postgres=CTc/postgres
 testdb    | postgres | UTF8     | C         | C     |
(4 rows)

■レプリケーション元のデータをレプリケーション先にコピー
レプリケーション元のデータをレプリケーション先にコピーします。
$ cd /usr/local/pgsql
$ tar zcvf data.tar.gz data
$ scp data.tar.gz レプリケーション先のホスト:/usr/local/pgsql/
レプリケーション先で
$ su - postgres
$ cd /usr/local/pgsql
設定ファイルのバックアップを取っておきます。
$ mkdir ~/conf_backup
$ cp -a data/*.conf ~/conf_backup/
レプリケーション元のデータを展開します。
$ tar zxvf data.tar.gz
バックアップした設定ファイルを戻します。
$ cp -a ~/conf_backup/*.conf data/
プロセスIDは削除します。
$ rm -f data/postmaster.pid
PostgreSQLを起動します。
$ exit
$ sudo /etc/init.d/postgresql start

■確認
レプリケーション元でtestdbにテーブルを作成してみます。
$ su - postgres
$ psql testdb
testdb=# create table table1 (id integer, create_date timestamp default current_timestamp);
testdb=# \d
         List of relations
 Schema |  Name  | Type  |  Owner
--------+--------+-------+----------
 public | table1 | table | postgres
(1 row)
testdb=# \d table1
                   Table "public.table1"
   Column    |            Type             |   Modifiers
-------------+-----------------------------+---------------
 id          | integer                     |
 create_date | timestamp without time zone | default now()
レプリケーション先で確認します。
$ su - postgres
$ psql testdb
testdb=# \dt
         List of relations
 Schema |  Name  | Type  |  Owner
--------+--------+-------+----------
 public | table1 | table | postgres
(1 row)
testdb=# \d table1
                   Table "public.table1"
   Column    |            Type             |   Modifiers
-------------+-----------------------------+---------------
 id          | integer                     |
 create_date | timestamp without time zone | default now()
レプリケーション元でデータベースを作成します。
$ createdb testdb2
$ psql -l
                              List of databases
   Name    |  Owner   | Encoding | Collation | Ctype |   Access privileges
-----------+----------+----------+-----------+-------+-----------------------
 postgres  | postgres | UTF8     | C         | C     |
 template0 | postgres | UTF8     | C         | C     | =c/postgres          +
           |          |          |           |       | postgres=CTc/postgres
 template1 | postgres | UTF8     | C         | C     | =c/postgres          +
           |          |          |           |       | postgres=CTc/postgres
 testdb    | postgres | UTF8     | C         | C     |
 testdb2   | postgres | UTF8     | C         | C     |
(5 rows)
レプリケーション先で確認します。
$ psql -l
                              List of databases
   Name    |  Owner   | Encoding | Collation | Ctype |   Access privileges
-----------+----------+----------+-----------+-------+-----------------------
 postgres  | postgres | UTF8     | C         | C     |
 template0 | postgres | UTF8     | C         | C     | =c/postgres          +
           |          |          |           |       | postgres=CTc/postgres
 template1 | postgres | UTF8     | C         | C     | =c/postgres          +
           |          |          |           |       | postgres=CTc/postgres
 testdb    | postgres | UTF8     | C         | C     |
 testdb2   | postgres | UTF8     | C         | C     |
(5 rows)

割と簡単に設定できました。
そのうち、レプリケーション先の追加や、レプリケーション先の昇格などやってみたいと思います。

2010年7月16日金曜日

DataTableをBindingSourceのDataSourceに設定したときの注意点

0 コメント
ADO.NETのDataTableをBindingSourceのDataSourceに設定して、BindingSourceのFilterに条件を設定したとき、DataTable.DefaultViewのRowFilterに、BindingSourceのFilterの内容が設定されるみたい。
このため、1つのDataTableをBindingSourceのDataSourceやComboBoxのDataSourceなど、複数のコントロールのDataSourceに使用すると、どれか1つのコントロールでFilterを設定すると、すべてのコントロールでFilterがかかった状態になる。

これを回避するために、1つのDataTableを複数のコントロールのDataSourceとして使いたいときは、各コントロールのDataSourceにそれぞれDataViewを(DataTableから)生成して設定すればよい。

VirtualBoxでubuntuの仮想サーバーをコピー

0 コメント
コマンドプロンプトで、
vboxmanage clonevdi コピー元.vdi コピー先.vdi
で、仮想マシンのハードディスクを複製して、複製したハードディスクを使って仮想マシンを登録。

MACアドレスが変わるためかubuntuではeth1が追加されてしまい、ネットワークがうまく繋がらなくなってしまうので、
/etc/udev/rules.d/70-persistent-net.rules
を編集。

2010年6月4日金曜日

VMWareメモ

0 コメント
■VMWareにSSHで接続
unsupportedモードでコンソールに入って、inetdのsshdを有効にする。
・コンソール画面で、ALT+F1を押す。
・続けて、rootのパスワードを入力する(画面には何も表示されない)。
・/etc/inetd.confをviなどで開いて、sshの行のコメントを外す。
・VMWareを再起動。
これでSSHで接続できるようになる。

■VMWare-Toolsのインストール(ubuntu10.04の場合)
・仮想マシンが起動している状態で、vSphere Clientから、仮想マシンの右クリック→[ゲスト]→[VMWare Toolsのインストール/アップグレード]を選択。
・CD-ROMをマウント
$ sudo mount /dev/sr0 /cdrom
・カーネルのヘッダファイルをインストール
$ uname -a
$ sudo apt-get install linux-headers-xxxxxxxx
・開発環境をインストール
$ sudo apt-get install build-essential
・VMWare Toolsのインストール
$ tar zxvf /cdrom/VMwareTools-4.0.0-171294.tar.gz
$ cd vmware-tools-distrib/
$ sudo ./vmware-install.pl
質問にはすべてデフォルトでOK
インストールが終わったら、プロセスを確認。
$ ps ax | grep vmware-tools
14351 ? Ss 0:00 /usr/lib/vmware-tools/sbin32/vmware-guestd --background /var/run/vmware-guestd.pid
という感じで、vmware-toolsのプロセスが走っていれば完了。
・vSphere Clientの仮想マシンを右クリックして→[電源]→[ゲストのシャットダウン]をして、仮想マシンがシャットダウンされればOK。